第八章
Thymeleaf实现搜索页面渲染及商品静态页
优就业.JAVA教研室
学习目标
目标1:搜索页面渲染
目标2:Thymeleaf的介绍
目标3:Thymeleaf的入门
目标4:Thymeleaf的语法及标签
目标5:搜索页面渲染
目标6:商品详情页静态化工程搭建
目标7:商品详情页静态化功能实现
目标8:用户修改商品信息,同步更新创建商品详情页
一 Thymeleaf入门
1 Thymeleaf介绍
thymeleaf是一个XML/XHTML/HTML5模板引擎,可用于Web与非Web环境中的应用开发。它是一个开源的Java库,基于Apache License 2.0许可,由Daniel Fernández创建,该作者还是Java加密库Jasypt的作者。
Thymeleaf提供了一个用于整合Spring MVC的可选模块,在应用开发中,你可以使用Thymeleaf来完全代替JSP或其他模板引擎,如Velocity、FreeMarker等。Thymeleaf的主要目标在于提供一种可被浏览器正确显示的、格式良好的模板创建方式,因此也可以用作静态建模。你可以使用它创建经过验证的XML与HTML模板。相对于编写逻辑或代码,开发者只需将标签属性添加到模板中即可。接下来,这些标签属性就会在DOM(文档对象模型)上执行预先制定好的逻辑。
它的特点便是:开箱即用,Thymeleaf允许您处理六种模板,每种模板称为模板模式:
- XML
- 有效的XML
- XHTML
- 有效的XHTML
- HTML5
- 旧版HTML5
所有这些模式都指的是格式良好的XML文件,但*Legacy HTML5*模式除外,它允许您处理HTML5文件,其中包含独立(非关闭)标记,没有值的标记属性或不在引号之间写入的标记属性。为了在这种特定模式下处理文件,Thymeleaf将首先执行转换,将您的文件转换为格式良好的XML文件,这些文件仍然是完全有效的HTML5(实际上是创建HTML5代码的推荐方法)1。
另请注意,验证仅适用于XML和XHTML模板。
然而,这些并不是Thymeleaf可以处理的唯一模板类型,并且用户始终能够通过指定在此模式下解析模板的方法和编写结果的方式来定义他/她自己的模式。这样,任何可以建模为DOM树(无论是否为XML)的东西都可以被Thymeleaf有效地作为模板处理。
2 Springboot整合thymeleaf
使用springboot 来集成使用Thymeleaf可以大大减少单纯使用thymleaf的代码量,所以我们接下来使用springboot集成使用thymeleaf.
实现的步骤为:
- 创建一个sprinboot项目
- 添加thymeleaf的起步依赖
- 添加spring web的起步依赖
- 编写html 使用thymleaf的语法获取变量对应后台传递的值
- 编写controller 设置变量的值到model中
(1)创建工程
创建一个独立的工程springboot-thymeleaf,该工程为案例工程,不需要放到dongyimai-parent工程中。
pom.xml依赖
<?xml version="1.0" encoding="UTF-8"?>
<project xmlns="http://maven.apache.org/POM/4.0.0"
         xmlns:xsi="http://www.w3.org/2001/XMLSchema-instance"
         xsi:schemaLocation="http://maven.apache.org/POM/4.0.0 http://maven.apache.org/xsd/maven-4.0.0.xsd">
    <modelVersion>4.0.0</modelVersion>

    <groupId>com.offcn</groupId>
    <artifactId>springboot-thymeleaf</artifactId>
    <version>1.0-SNAPSHOT</version>

    <parent>
        <groupId>org.springframework.boot</groupId>
        <artifactId>spring-boot-starter-parent</artifactId>
        <version>2.3.9.RELEASE</version>
    </parent>

    <dependencies>
        <!--web起步依赖-->
        <dependency>
            <groupId>org.springframework.boot</groupId>
            <artifactId>spring-boot-starter-web</artifactId>
        </dependency>

        <!--thymeleaf配置-->
        <dependency>
            <groupId>org.springframework.boot</groupId>
            <artifactId>spring-boot-starter-thymeleaf</artifactId>
        </dependency>
    </dependencies>
</project>
(2)创建html
在resources中创建templates目录,在templates目录创建 demo1.html,代码如下:
<!DOCTYPE html>
<html xmlns:th="http://www.thymeleaf.org">
<head>
    <title>Thymeleaf的入门</title>
    <meta http-equiv="Content-Type" content="text/html; charset=UTF-8"/>
</head>
<body>
<!--输出hello数据-->
<p th:text="${hello}"></p>
</body>
</html>
解释:
<html xmlns:th="http://www.thymeleaf.org">:这句声明使用thymeleaf标签
<p th:text="${hello}"></p>:这句使用 th:text="${变量名}" 表示 使用thymeleaf获取文本数据,类似于EL表达式。
(3)修改application.yml配置
创建application.yml,并设置thymeleaf的缓存设置,设置为false。默认加缓存的,用于测试。
spring:
  thymeleaf:
    cache: false
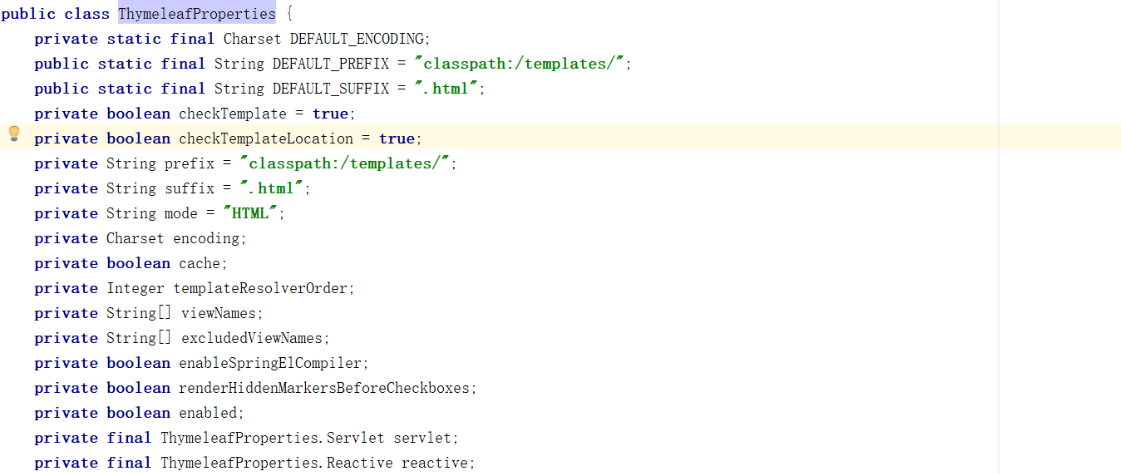
在这里,其实还有一些默认配置,比如视图前缀:classpath:/templates/,视图后缀:.html
org.springframework.boot.autoconfigure.thymeleaf.ThymeleafProperties部分源码如下:
(4)控制层
创建controller用于测试后台 设置数据到model中。
创建com.offcn.controller.TestController,代码如下:
@Controller
@RequestMapping("/test")
public class TestController {

    /***
     * 访问/test/hello  跳转到demo1页面
     * @param model
     * @return
     */
    @RequestMapping("/hello")
    public String hello(Model model){
        model.addAttribute("hello","hello welcome");
        return "demo1";
    }
}
(5)测试
创建启动类com.offcn.ThymeleafApplication,代码如下:
@SpringBootApplication
public class ThymeleafApplication {

    public static void main(String[] args) {
        SpringApplication.run(ThymeleafApplication.class,args);
    }
}
启动系统,并在浏览器访问
http://localhost:8080/test/hello

3 Thymeleaf基本语法
(1)th:action
定义后台控制器路径,类似<form>标签的action属性。
例如:
<form id="login-form" th:action="@{/test/hello}">
    <button>提交</button>
</form>
表示提交的请求地址为/test/hello
(2)th:each
对象遍历,功能类似jstl中的<c:forEach>标签。
创建com.offcn.model.User,代码如下:
public class User {
    private Integer id;
    private String name;
    private String address;
    //无参和全参构造器以及..get..set
}
Controller添加数据
/***
 * 访问/test/hello  跳转到demo1页面
 * @param model
 * @return
 */
@RequestMapping("/hello")
public String hello(Model model){
    model.addAttribute("hello","hello welcome");

    //集合数据
    List<User> users = new ArrayList<User>();
    users.add(new User(1,"张三","深圳"));
    users.add(new User(2,"李四","北京"));
    users.add(new User(3,"王五","武汉"));
    model.addAttribute("users",users);
    return "demo1";
}
页面输出
<table>
    <tr>
        <td>下标</td>
        <td>编号</td>
        <td>姓名</td>
        <td>住址</td>
    </tr>
    <tr th:each="user,userStat:${users}">
        <td>
            下标:<span th:text="${userStat.index}"></span>,
        </td>
        <td th:text="${user.id}"></td>
        <td th:text="${user.name}"></td>
        <td th:text="${user.address}"></td>
    </tr>
</table>
测试效果

(3)Map输出
后台添加Map
//Map定义
Map<String,Object> dataMap = new HashMap<String,Object>();
dataMap.put("No","123");
dataMap.put("address","深圳");
model.addAttribute("dataMap",dataMap);
页面输出
<div th:each="map,mapStat:${dataMap}">
    <div th:text="${map}"></div>
    key:<span th:text="${mapStat.current.key}"></span><br/>
    value:<span th:text="${mapStat.current.value}"></span><br/>
    ==============================================
</div>
测试效果

(4)数组输出
后台添加数组
//存储一个数组
String[] names = {"张三","李四","王五"};
model.addAttribute("names",names);
页面输出
<div th:each="nm,nmStat:${names}">
    <span th:text="${nmStat.count}"></span><span th:text="${nm}"></span>
    ==============================================
</div>
测试效果

(5)Date输出
后台添加日期
//日期
model.addAttribute("now",new Date());
页面输出
<div>
    <h1>Date输出 th:text</h1>
    <span th:text="${#dates.format(now,'yyyy-MM-dd hh:ss:mm')}"></span>
</div>
测试效果

(6)th:if条件
后台添加年龄
//if条件
model.addAttribute("age",22);
页面输出
<div>
     <h1>条件判断 th:if</h1>
    <span th:if="${(age>=18)}">终于长大了!</span>
</div>
测试效果

(7)使用javascript
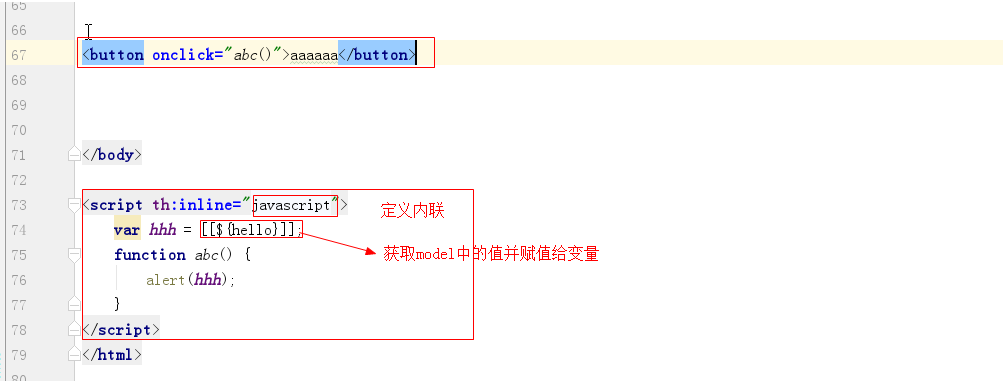
java代码为:

<button onclick="abc()">aaaaaaa</button>
</body>
<script th:inline="javascript">
    var hhh=[[${hello}]];
    function abc(){
        alert(hhh);
    }

</script>
</html>
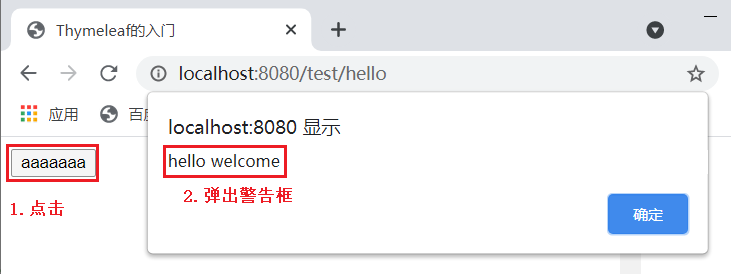
运行结果:(注意script放置在body外面)
(8)字符拼接 使用||
后台代码:

模板:

查看生成的页面demo1.html的源码,可以看到如下

二 搜索页面渲染(了解)
1 搜索分析

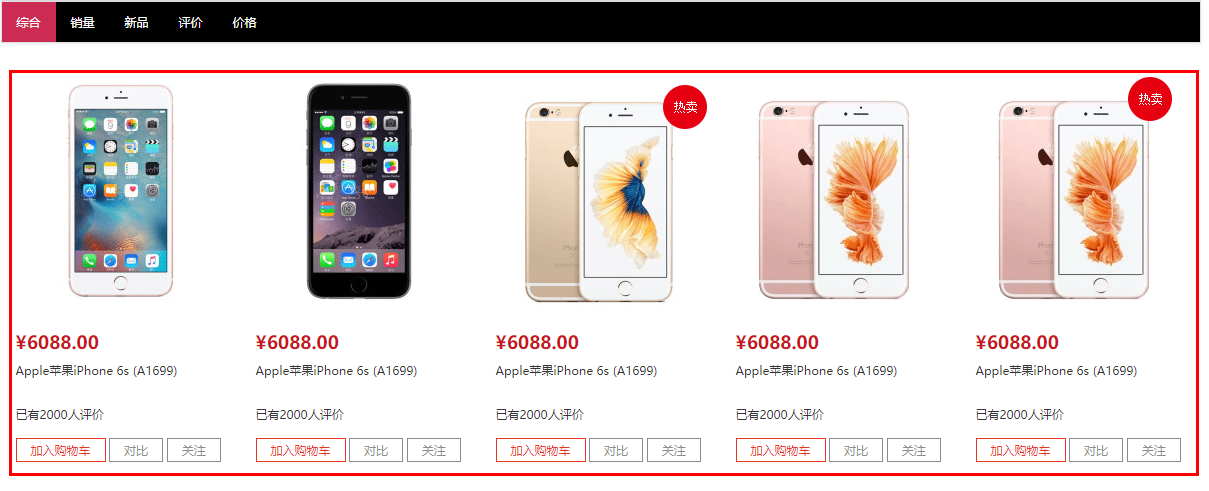
搜索页面要显示的内容主要分为3块。
1)搜索的数据结果
2)筛选出的数据搜索条件
3)用户已经勾选的数据条件
2 搜索实现

搜索的业务流程如上图,用户每次搜索的时候,先经过搜索业务工程,搜索业务工程调用搜索微服务工程,这里搜索业务工程单独挪出来的原因是它这里涉及到了模板渲染以及其他综合业务处理,以后很有可能会有移动端的搜索和PC端的搜索,后端渲染如果直接在搜索微服务中进行,会对微服务造成一定的侵入,不推荐这么做,推荐微服务独立,只提供服务,如果有其他页面渲染操作,可以搭建一个独立的消费工程调用微服务达到目的。
2.1 搜索工程搭建
(1)工程创建
在dongyimai-web工程中创建dongyimai-search-web工程,
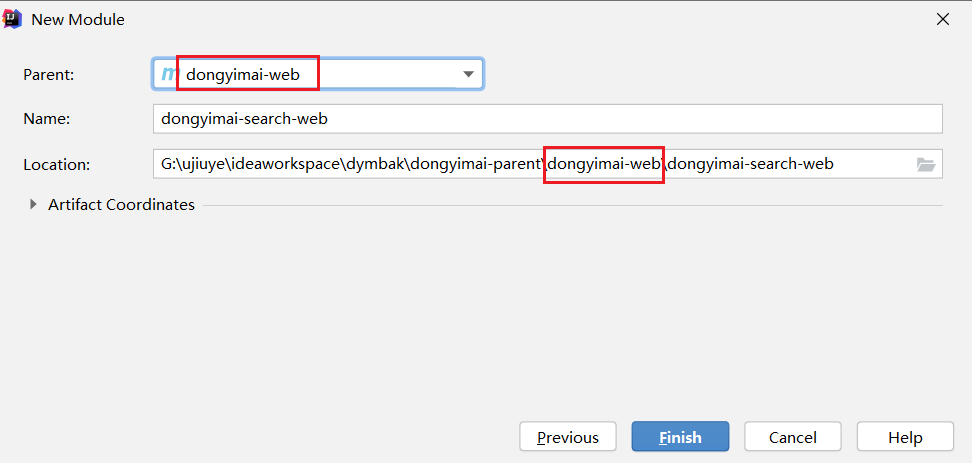
并在dongyimai-web的pom.xml中引入如下依赖:
<dependencies>
    <dependency>
        <groupId>org.springframework.boot</groupId>
        <artifactId>spring-boot-starter-thymeleaf</artifactId>
    </dependency>
    <dependency>
        <groupId>org.springframework.boot</groupId>
        <artifactId>spring-boot-starter-web</artifactId>
    </dependency>
    <dependency>
        <groupId>org.springframework.cloud</groupId>
        <artifactId>spring-cloud-starter-netflix-eureka-client</artifactId>
    </dependency>
    <!--feign-->
    <dependency>
        <groupId>org.springframework.cloud</groupId>
        <artifactId>spring-cloud-starter-openfeign</artifactId>
    </dependency>
</dependencies>
(2)静态资源导入
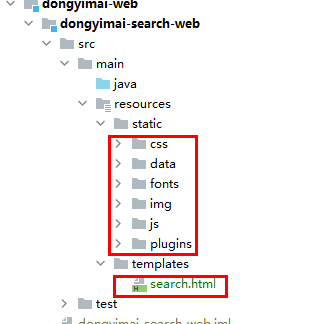
将资源中的页面/前端页面/search.html拷贝到工程的resources/templates目录下,js、css等拷贝到static目录下,如下图:
(3)Feign创建
dongyimai-search-service-api,添加com.offcn.search.feign.SearchSkuFeign,
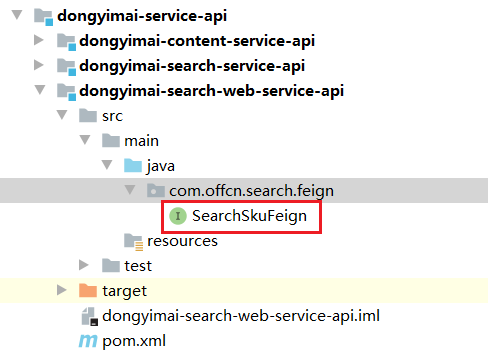
实现调用搜索,代码如下:
@FeignClient(name="search")
@RequestMapping("/search")
public interface SearchSkuFeign {

    /**
     * 搜索
     * @param searchMap
     * @return
     */
    @GetMapping
    Map search(@RequestBody(required = false) Map searchMap);
}
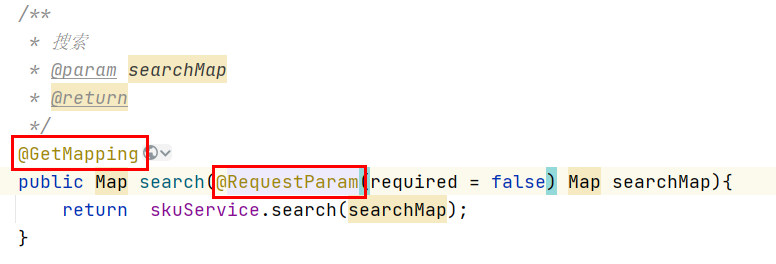
由于以后做搜索都是基于GET请求,所以我们需要将之前的搜索改成GET请求操作,修改dongyimai-search-service微服务的com.offcn.search.controller.SkuController里面的search方法,代码如下:
(4)dongyimai-search-web的pom.xml依赖dongyimai-search-service-api
        <dependency>
            <groupId>com.offcn</groupId>
            <artifactId>dongyimai-search-service-api</artifactId>
            <version>1.0</version>
            <exclusions>
                    <exclusion>
                        <groupId>com.alibaba</groupId>
                        <artifactId>druid-spring-boot-starter</artifactId>
                    </exclusion>
           </exclusions>
        </dependency>
(5)搜索调用
在dongyimai-search-web中创建com.offcn.search.controller.SkuController,实现调用搜索,代码如下:
@Controller
@RequestMapping(value = "/search")
public class SkuController {

    @Autowired
    private SearchSkuFeign searchSkuFeign;

    /**
     * 搜索
     * @param searchMap
     * @return
     */
    @GetMapping(value = "/list")
    public String search(@RequestParam(required = false) Map searchMap, Model model){
        //dongyimai-search-service微服务
        Map resultMap = searchSkuFeign.search(searchMap);
        model.addAttribute("result",resultMap);
        return "search";
    }
}
(6)启动类创建
修改dongyimai-search-web,添加启动类com.offcn.search.SearchWebApplication,代码如下:
@SpringBootApplication(exclude={DataSourceAutoConfiguration.class})
@EnableDiscoveryClient
@EnableFeignClients
public class SearchWebApplication {

    public static void main(String[] args) {
        SpringApplication.run(SearchWebApplication.class,args);
    }
}
(7)application.yml配置文件
server:
  port: 9101
eureka:
  client:
    service-url:
      defaultZone: http://127.0.0.1:8761/eureka
  instance:
    prefer-ip-address: true
feign:
  hystrix:
    enabled: true
spring:
  thymeleaf:
    cache: false
  application:
    name: search-web
  main:
    allow-bean-definition-overriding: true
(8)项目完整结构
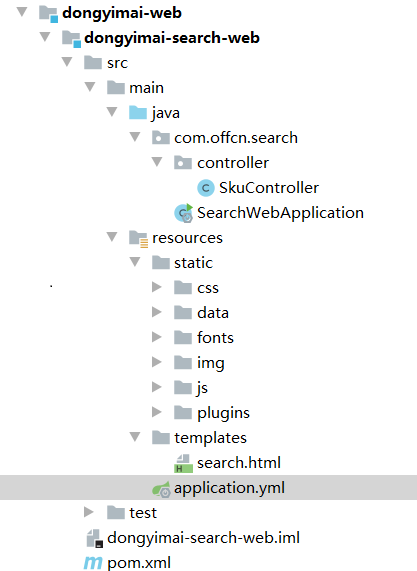
在search.html的头部引入thymeleaf标签
<html xmlns:th="http://www.thymeleaf.org">
将样式修改为:
<link rel="stylesheet" type="text/css" href="css/webbase.css" th:href="@{/css/webbase.css}"/>
<link rel="stylesheet" type="text/css" href="css/pages-list.css" th:href="@{/css/pages-list.css}"/>
<link rel="stylesheet" type="text/css" href="css/widget-cartPanelView.css"
			  th:href="@{/css/widget-cartPanelView.css}"/>
测试:http://localhost:9101/search,效果如下:
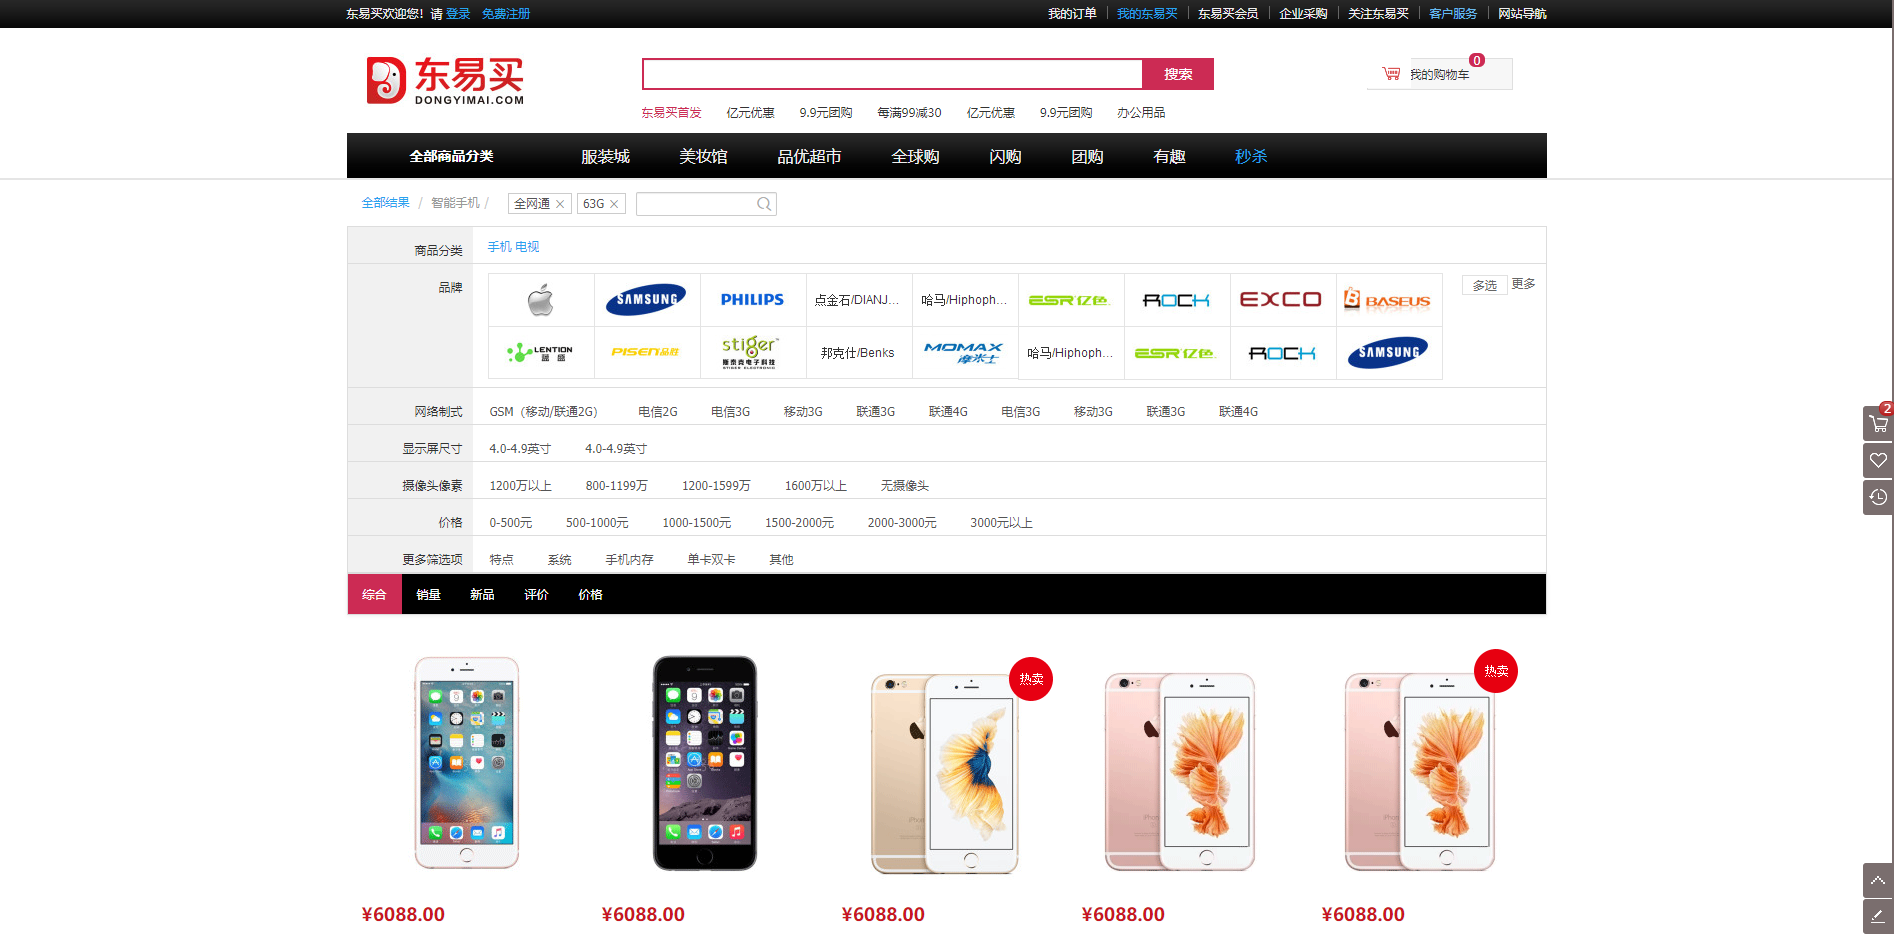
2.2 搜索数据填充
后端搜索到数据后,前端页面进行数据显示,显示的数据分为3部分
1)搜索的数据结果
2)筛选出的数据搜索条件
3)用户已经勾选的数据条件
2.3 关键字搜索
用户每次输入关键字的时候,直接根据关键字搜索,关键字搜索的数据会存储到result.rows中,页面每次根据result获取rows,然后循环输出即可,同时页面的搜索框每次需要回显搜索的关键词。
实现思路
1.前端表单提交搜索的关键词
2.后端根据关键词进行搜索
3.将搜索条件存储到Model中
4.页面循环迭代输出数据
5.搜索表单回显搜索的关键词
(1)后台搜索实现
修改SkuController的search方法,代码如下:
/**
 * 搜索
 * @param searchMap
 * @return
 */
@GetMapping(value = "/list")
public String search(@RequestParam(required = false) Map<String,String> searchMap, Model model){
    //调用dongyimai-search-service微服务
    Map<String,Object> resultMap = searchSkuFeign.search(searchMap);
    //搜索数据结果
    model.addAttribute("result",resultMap);
    //搜索条件
    model.addAttribute("searchMap",searchMap);
    return "search";
}
(2)页面搜索实现
修改search.html

<form action="/search/list" class="sui-form form-inline">
   <!--searchAutoComplete-->
   <div class="input-append">
      <input type="text" id="autocomplete" name="keywords"
            th:value="${#maps.containsKey(searchMap,'keywords')}?${searchMap.keywords}:''"
            class="input-error input-xxlarge" />
      <button class="sui-btn btn-xlarge btn-danger" type="submit">搜索</button>
   </div>
</form>
注意:搜索按钮为submit提交。
(3)页面结果输出
修改search.html,代码如下:
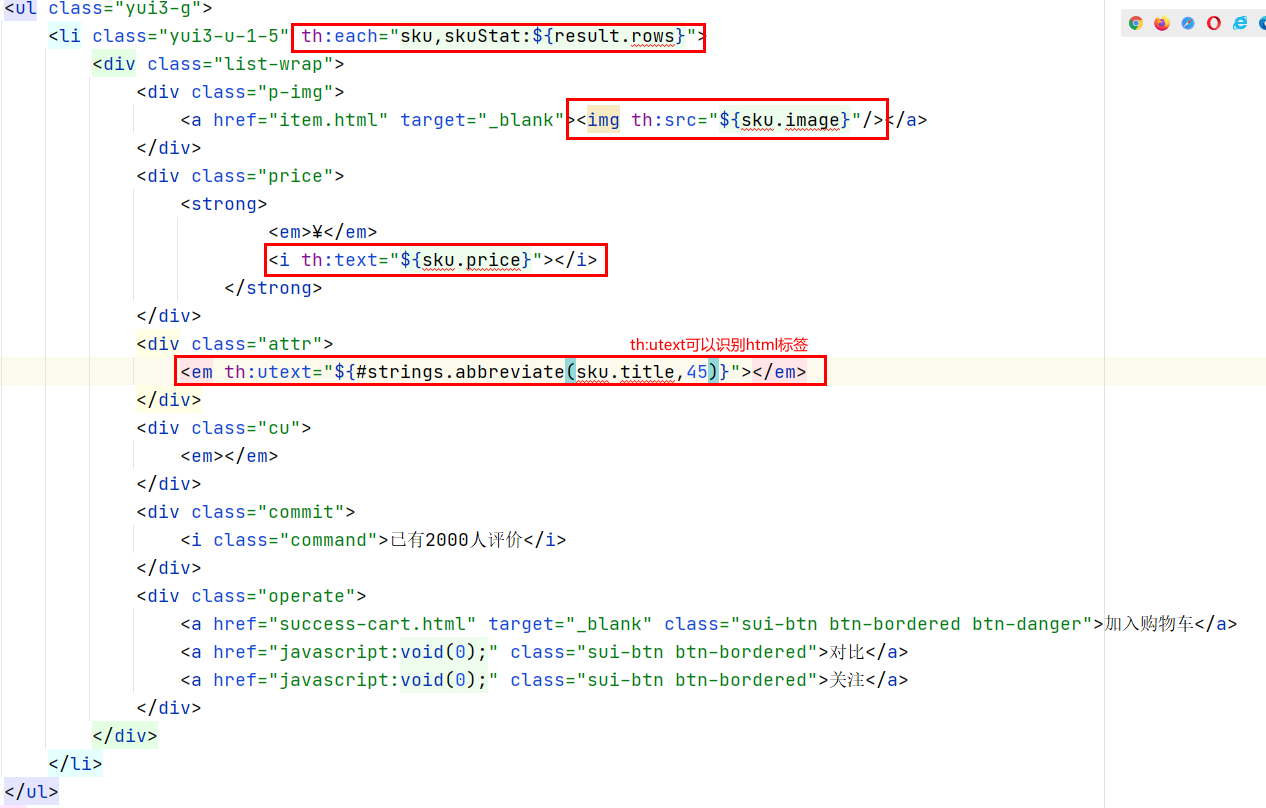
<ul class="yui3-g">
   <li class="yui3-u-1-5" th:each="sku,skuStat:${result.rows}">
      <div class="list-wrap">
         <div class="p-img">
            <a href="item.html" target="_blank"><img th:src="${sku.image}" /></a>
         </div>
         <div class="price">
            <strong>
                  <em>¥</em>
                  <i th:text="${sku.price}"></i>
               </strong>
         </div>
         <div class="attr">
            <em th:utext="${#strings.abbreviate(sku.title,45)}"></em>
         </div>
         <div class="cu">
            <em></em>
         </div>
         <div class="commit">
            <i class="command">已有2000人评价</i>
         </div>
         <div class="operate">
            <a href="success-cart.html" target="_blank" class="sui-btn btn-bordered btn-danger">加入购物车</a>
            <a href="javascript:void(0);" class="sui-btn btn-bordered">对比</a>
            <a href="javascript:void(0);" class="sui-btn btn-bordered">关注</a>
         </div>
      </div>
   </li>

</ul>
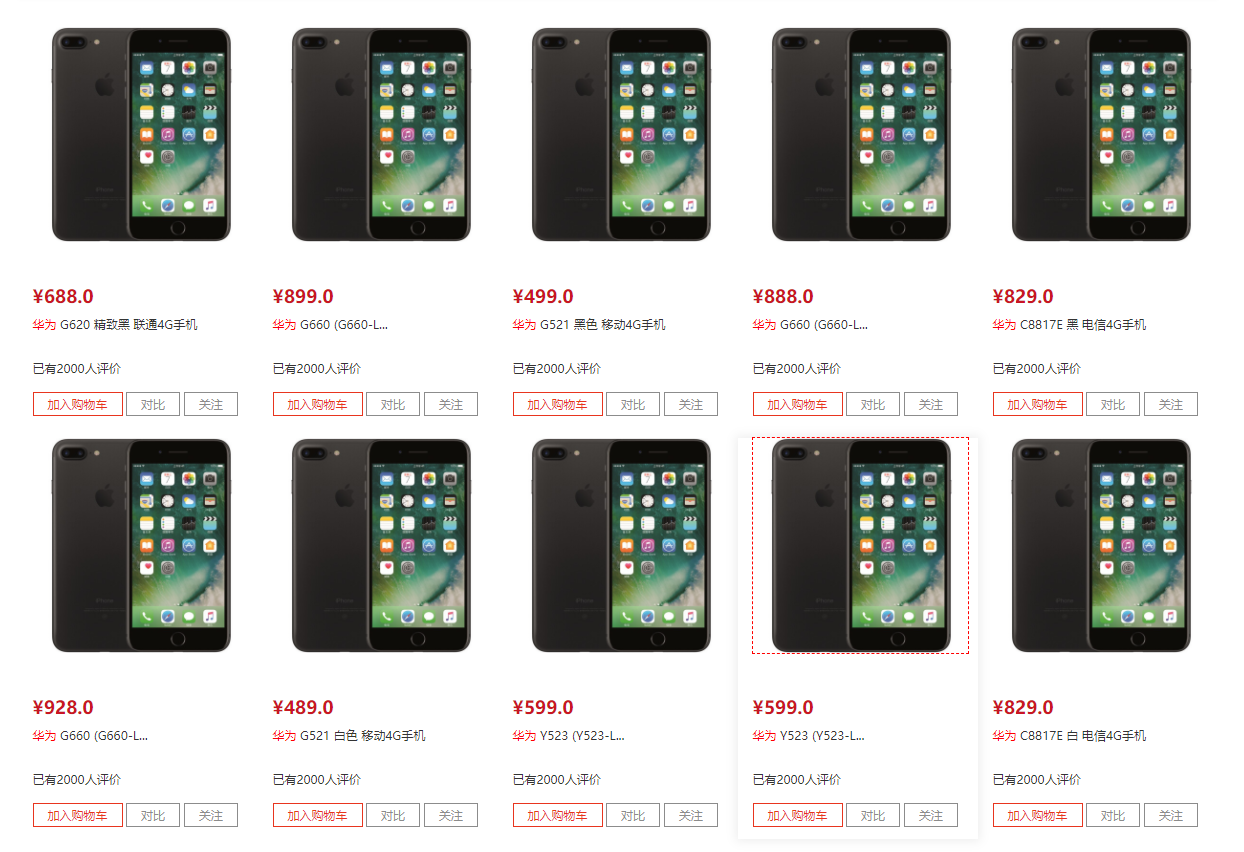
(4)测试,在地址栏输入:http://localhost:9101/search/list/
搜索华为关键字,效果如下:
2.4 搜索条件回显
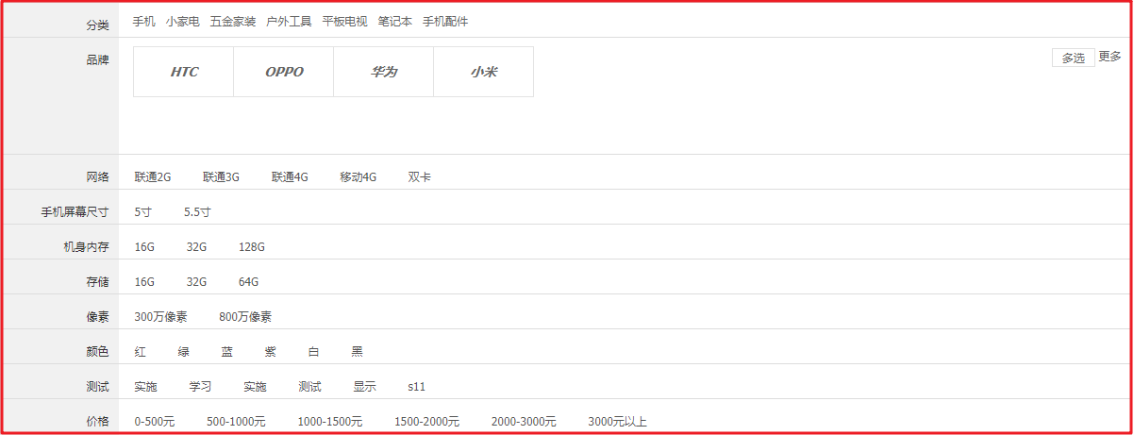
搜索条件除了关键字外,还有分类、品牌、以及规格,这些在我们前面已经将数据存入到了Map中,我们可以直接从Map中将数据取出,然后在页面输出即可。
分类:result.categoryList
品牌:result.brandList
规格:result.specList
修改search.html的条件显示部分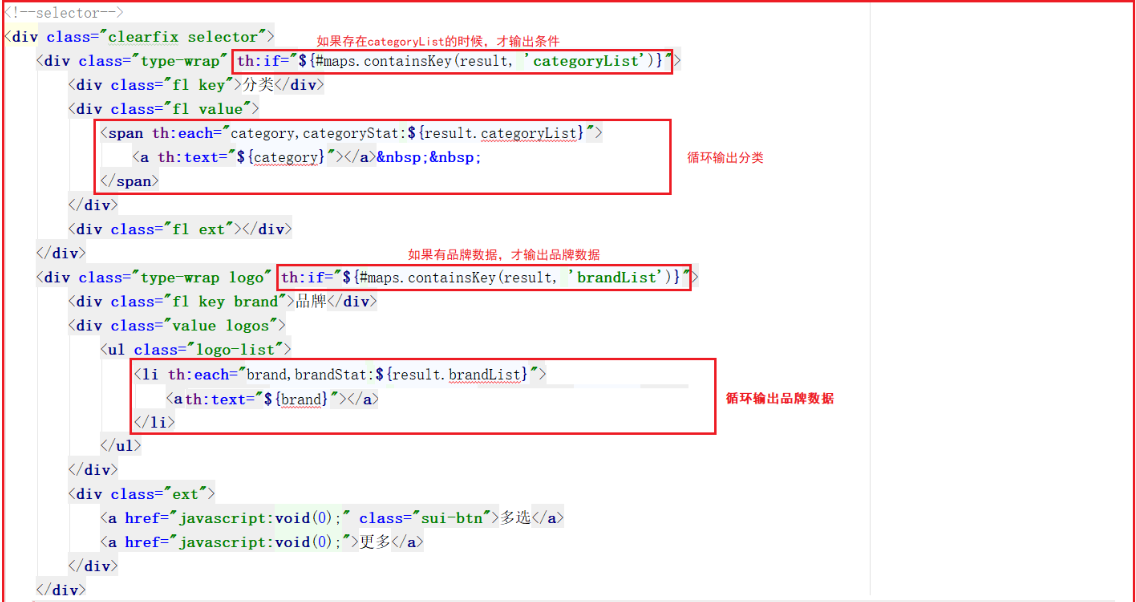
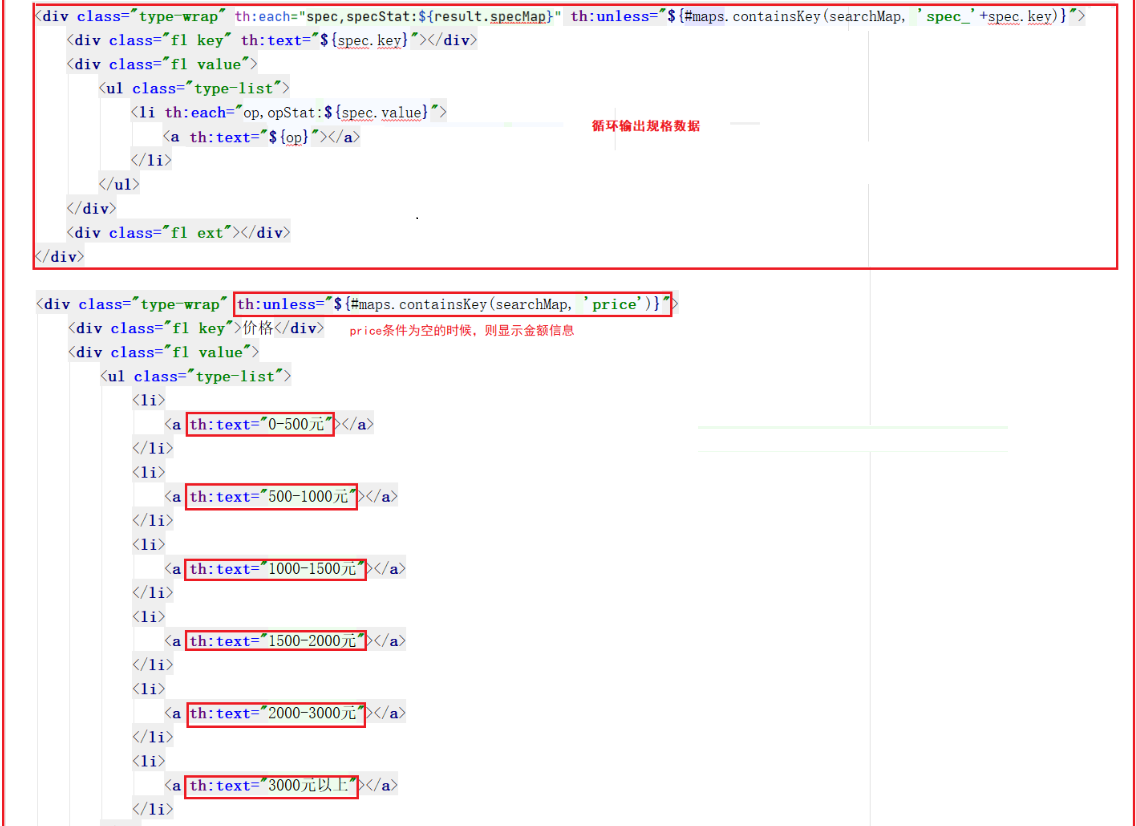
上图代码如下:
<!--selector-->
<div class="clearfix selector">
<div class="type-wrap" th:if="${#maps.containsKey(result,'categoryList')&&!#maps.containsKey(searchMap,'category')}">
<div class="fl key">商品分类</div>
<div class="fl value">
<span th:each="category,categoryStat:${result.categoryList}">
<a th:text="${category}"></a>
</span>
</div>
<div class="fl ext"></div>
</div>
<div class="type-wrap logo" th:if="${#maps.containsKey(result,'brandList')&&!#maps.containsKey(searchMap,'brand')}">
<div class="fl key brand">品牌</div>
<div class="value logos">
<ul class="logo-list">
<li th:each="brand,brandStat:${result.brandList}">
<a th:text="${brand}"></a>
</li>
</ul>
</div>
<div class="ext">
<a href="javascript:void(0);" class="sui-btn">多选</a>
<a href="javascript:void(0);">更多</a>
</div>
</div>
<div class="type-wrap" th:each="spec,specStat:${result.specMap}" th:unless="${#maps.containsKey(searchMap,'spec_'+spec.key)}">
<div class="fl key" th:text="${spec.key}"></div>
<div class="fl value">
<ul class="type-list">
<li th:each="op,opStat:${spec.value}">
<a th:text="${op}"></a>
</li>
</ul>
</div>
<div class="fl ext"></div>
</div>
<div class="type-wrap" th:unless="${#maps.containsKey(searchMap,'price')}">
<div class="fl key">价格</div>
<div class="fl value">
<ul class="type-list">
<li>
<a th:text="0-500元"></a>
</li>
<li>
<a th:text="500-1000元"></a>
</li>
<li>
<a th:text="1000-1500元"></a>
</li>
<li>
<a th:text="1500-2000元"></a>
</li>
<li>
<a th:text="2000-3000元"> </a>
</li>
<li>
<a th:text="3000元以上"></a>
</li>
</ul>
</div>
<div class="fl ext">
</div>
</div>
<div class="type-wrap">
<div class="fl key">更多筛选项</div>
<div class="fl value">
<ul class="type-list">
<li>
<a>特点</a>
</li>
<li>
<a>系统</a>
</li>
<li>
<a>手机内存 </a>
</li>
<li>
<a>单卡双卡</a>
</li>
<li>
<a>其他</a>
</li>
</ul>
</div>
<div class="fl ext">
</div>
</div>
</div>
<!--details-->
解释:
th:unless:条件不满足时,才显示
${#maps.containsKey(result,'brandList')}:map中包含某个key
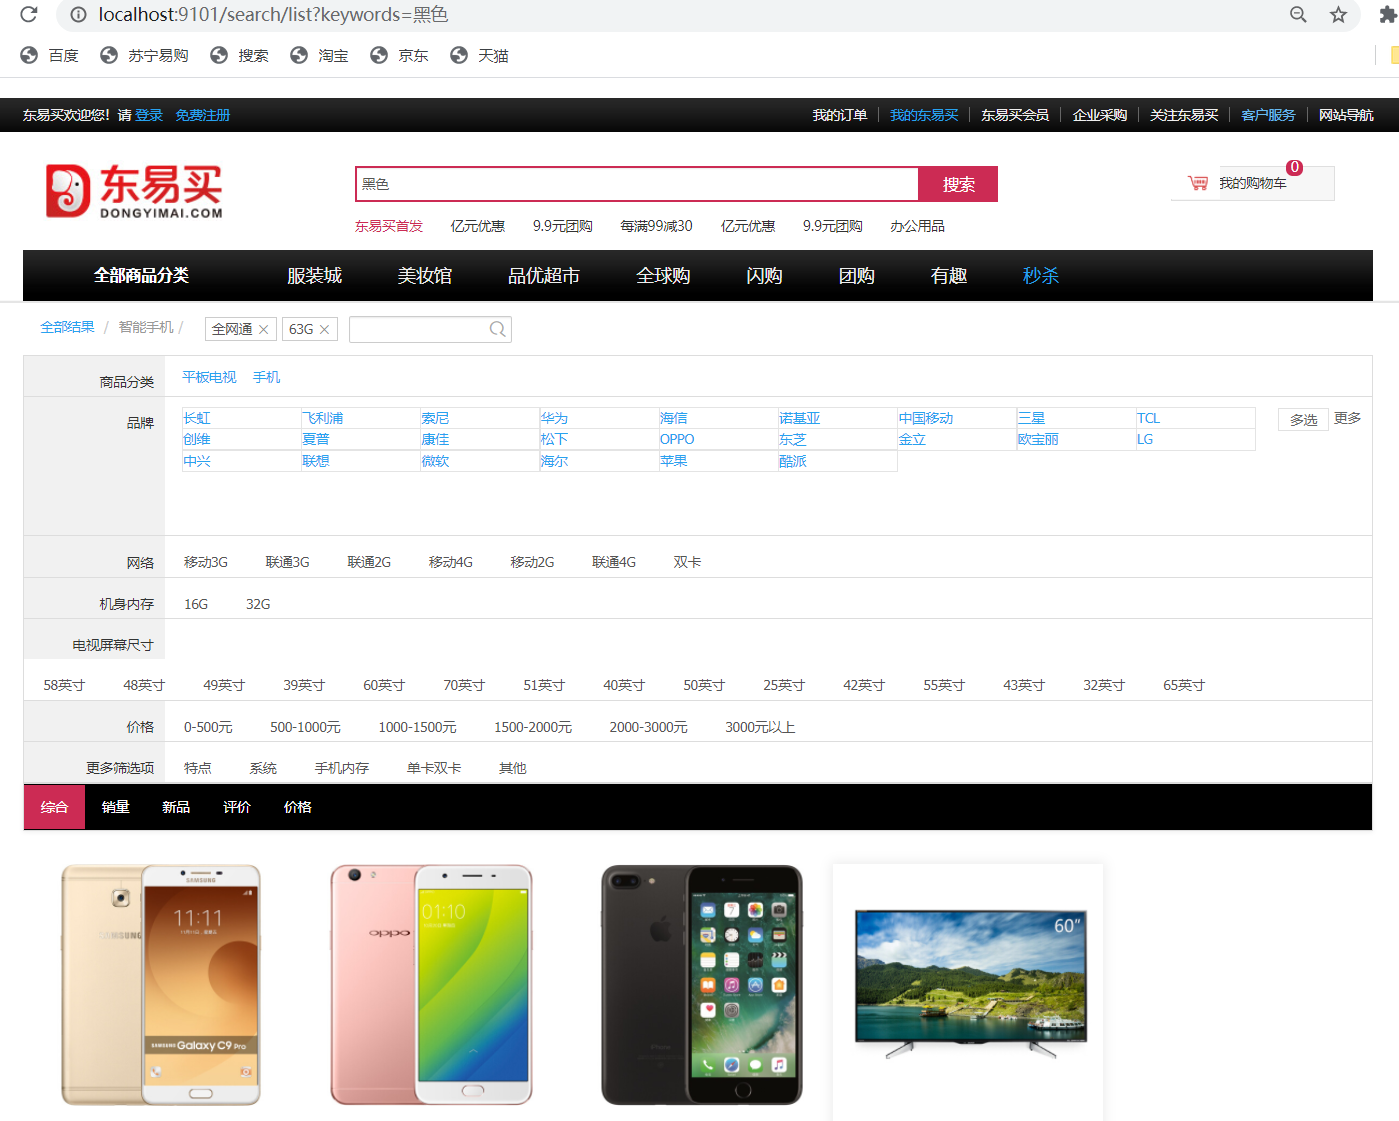
测试:访问:http://localhost:9101/search/list 输入 关键字 黑色
2.5 条件搜索实现

用户每次点击搜索的时候,其实在上次搜索的基础之上加上了新的搜索条件,也就是在上一次请求的URL后面追加了新的搜索条件,我们可以在后台每次拼接组装出上次搜索的URL,然后每次将URL存入到Model中,页面每次点击不同条件的时候,从Model中取出上次请求的URL,然后再加上新点击的条件参数实现跳转即可。
(1)后台记录搜索URL
修改SkuController,添加组装URL的方法,并将组装好的URL存储起来,代码如下:
/**
     * 搜索
     * @param searchMap
     * @return
     */
    @GetMapping(value = "/list")
    public String search(@RequestParam(required = false) Map searchMap, Model model){
        //1.调用搜索微服务的 feign  根据搜索的条件参数 查询 数据
        //调用dongyimai-search-service微服务
        Map resultMap = searchSkuFeign.search(searchMap);
        //2.将数据设置到model中     (模板文件中 根据th:标签数据展示)
        model.addAttribute("result",resultMap);
        //3.设置搜索的条件 回显
        model.addAttribute("searchMap",searchMap);
        //4.记住之前的URL
        //拼接url
        String url = this.setUrl(searchMap);
        model.addAttribute("url",url);
        return "search";
    }
 private String setUrl(Map<String, String> searchMap) {
        String url = "/search/list";
        if(searchMap!=null && searchMap.size()>0){
            url+="?";
            for (Map.Entry<String, String> stringStringEntry : searchMap.entrySet()) {
                String key = stringStringEntry.getKey();// keywords / brand  / category
                String value = stringStringEntry.getValue();//华为  / 华为  / 笔记本
                if(key.equals("pageNum")){
                    continue;
                }
                url+=key+"="+value+"&";
            }

            //去掉多余的&
            if(url.lastIndexOf("&")!=-1){
                url =  url.substring(0,url.lastIndexOf("&"));
            }

        }
        return url;
    }
(2)页面搜索对接
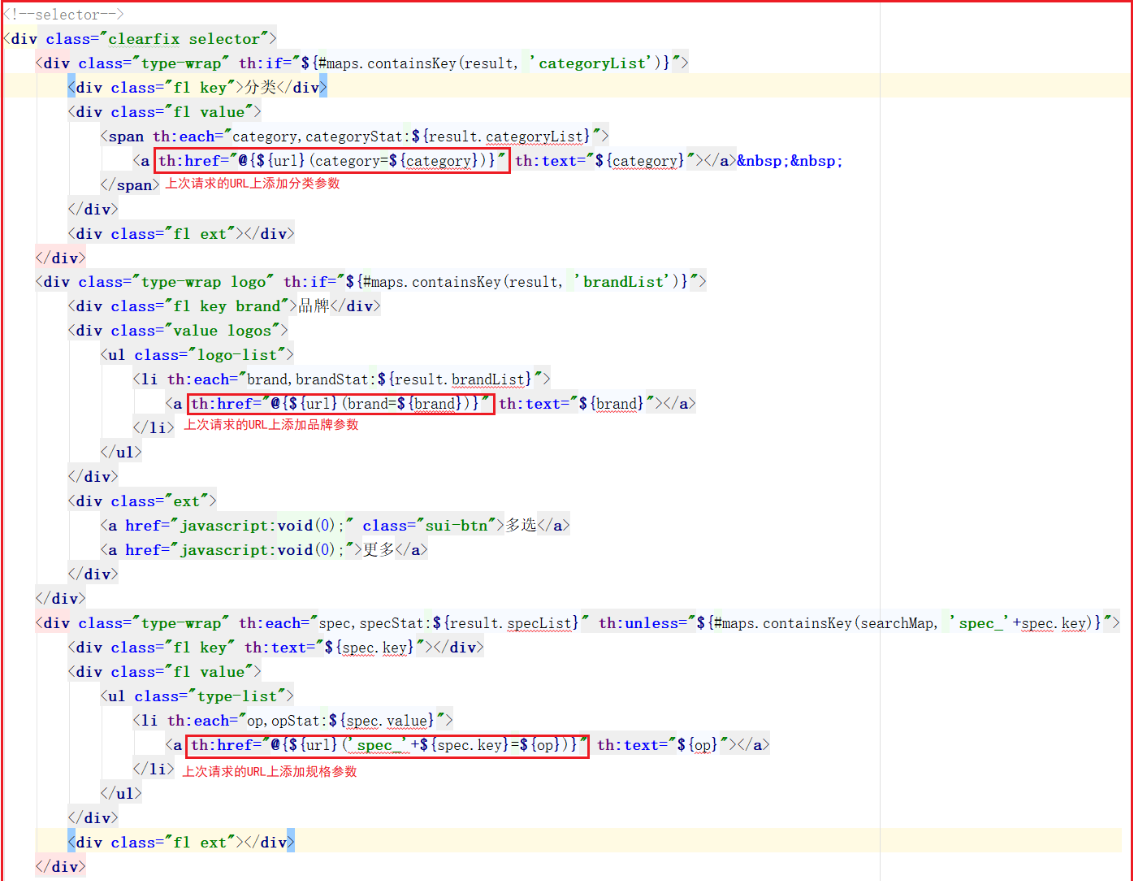
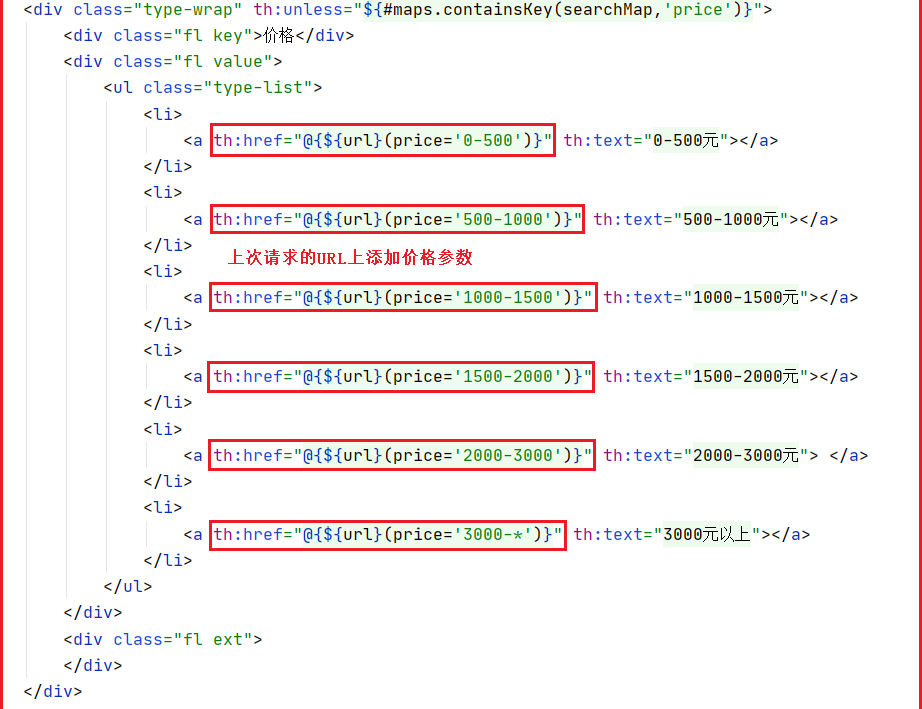
完整代码如下:
<!--selector-->
<div class="clearfix selector">
<div class="type-wrap" th:if="${#maps.containsKey(result,'categoryList')}">
<div class="fl key">商品分类</div>
<div class="fl value">
<span th:each="category,categoryStat:${result.categoryList}">
<a th:href="@{${url}(category=${category})}" th:text="${category}"></a>
</span>
</div>
<div class="fl ext"></div>
</div>
<div class="type-wrap logo" th:if="${#maps.containsKey(result,'brandList')}">
<div class="fl key brand">品牌</div>
<div class="value logos">
<ul class="logo-list">
<li th:each="brand,brandStat:${result.brandList}">
<a th:href="@{${url}(brand=${brand})}" th:text="${brand}"></a>
</li>
</ul>
</div>
<div class="ext">
<a href="javascript:void(0);" class="sui-btn">多选</a>
<a href="javascript:void(0);">更多</a>
</div>
</div>
<div class="type-wrap" th:each="spec,specStat:${result.specMap}" th:unless="${#maps.containsKey(searchMap,'spec_'+spec.key)}">
<div class="fl key" th:text="${spec.key}"></div>
<div class="fl value">
<ul class="type-list">
<li th:each="op,opStat:${spec.value}">
<a th:href="@{${url}('spec_'+${spec.key}=${op})}" th:text="${op}"></a>
</li>
</ul>
</div>
<div class="fl ext"></div>
</div>
<div class="type-wrap" th:unless="${#maps.containsKey(searchMap,'price')}">
<div class="fl key">价格</div>
<div class="fl value">
<ul class="type-list">
<li>
<a th:href="@{${url}(price='0-500')}" th:text="0-500元"></a>
</li>
<li>
<a th:href="@{${url}(price='500-1000')}" th:text="500-1000元"></a>
</li>
<li>
<a th:href="@{${url}(price='1000-1500')}" th:text="1000-1500元"></a>
</li>
<li>
<a th:href="@{${url}(price='1500-2000')}" th:text="1500-2000元"></a>
</li>
<li>
<a th:href="@{${url}(price='2000-3000')}" th:text="2000-3000元"> </a>
</li>
<li>
<a th:href="@{${url}(price='3000-*')}" th:text="3000元以上"></a>
</li>
</ul>
</div>
<div class="fl ext">
</div>
</div>
th:href 这里是超链接的语法,例如:th:href="@{${url}(price='500-1000')}"表示请求地址是取url参数的值,同时向后台传递参数price的值为500-100。
如下是查询的时候,后台使用打印输出语句输出的结果

2.6 移除搜索条件

如上图,用户点击条件搜索后,要将选中的条件显示出来,并提供移除条件的x按钮,显示条件我们可以从searchMap中获取,移除其实就是将之前的请求地址中的指定条件删除即可。
(1)条件显示
修改search.html,代码如下:
<!--bread-->
        <div class="bread">
            <ul class="fl sui-breadcrumb">
                <li>
                    <a href="#" th:text="${result.total}">全部结果</a>
                </li>
            </ul>
            <ul class="tags-choose">
                <li class="tag" th:if="${#maps.containsKey(searchMap,'category')}">商品分类:<i
                        th:text="${searchMap.category}"></i></a>
                </li>
                <li class="tag" th:if="${#maps.containsKey(searchMap,'brand')}">品牌:<i
                        th:text="${searchMap.brand}"></i>
                </li>
                <li class="tag" th:if="${#maps.containsKey(searchMap,'price')}">价格:<i
                        th:text="${searchMap.price}"></i>
                </li>
                <li class="tag" th:each="spec,specStat:${searchMap}" th:if="${#strings.startsWith(spec.key,'spec_')}">
                    <i th:text="${#strings.substring(spec.key,5)}">手机屏幕尺寸</i>
                    :
                    <i th:text="${spec.value}">5.5寸</i>
                </li>
            </ul>
            <div class="clearfix"></div>
        </div>
解释:
${#strings.startsWith(spec.key,'spec_')}:表示以spec_开始的key
${#strings.replace(spec.key,'spec_','')}:表示将spec.key中的spec_替换成空
(2)移除搜索条件
修改search.html,移除分类、品牌、价格、规格搜索条件,代码如下:
<!--bread-->
        <div class="bread">
            <ul class="fl sui-breadcrumb">
                <li>
                    <a href="#" th:text="${result.total}">全部结果</a>
                </li>
            </ul>
            <ul class="tags-choose">
                <li class="tag" th:if="${#maps.containsKey(searchMap,'category')}">商品分类:<i
                        th:text="${searchMap.category}"></i><a class="sui-icon icon-tb-close"
                                                               th:href="@{${#strings.replace(url,'category='+searchMap.category,'')}}"></a>
                </li>
                <li class="tag" th:if="${#maps.containsKey(searchMap,'brand')}">品牌:<i
                        th:text="${searchMap.brand}"></i><a class="sui-icon icon-tb-close"
                                                            th:href="@{${#strings.replace(url,'brand='+searchMap.brand,'')}}"></a>
                </li>
                <li class="tag" th:if="${#maps.containsKey(searchMap,'price')}">价格:<i
                        th:text="${searchMap.price}"></i><a class="sui-icon icon-tb-close"
                                                            th:href="@{${#strings.replace(url,'price='+searchMap.price,'')}}"></a>
                </li>
                <li class="tag" th:each="spec,specStat:${searchMap}" th:if="${#strings.startsWith(spec.key,'spec_')}">
                    <i th:text="${#strings.substring(spec.key,5)}">手机屏幕尺寸</i>
                    :
                    <i th:text="${spec.value}">5.5寸</i>
                    <a class="sui-icon icon-tb-close"
                       th:href="@{${#strings.replace(url,spec.key+'='+spec.value,'')}}"></a></li>
            </ul>
            <div class="clearfix"></div>
        </div>
2.7 选中搜索条件隐藏搜索面板项
当有选中的搜索条件的时候,对应的搜索面板项就隐藏掉,避免出现用户重复选择的情况

实现代码,在没个搜索项上增加控制条件,当存在搜索条件的时候,就隐藏搜索面板项
<div class="type-wrap" th:if="${#maps.containsKey(result,'categoryList')} and !${#maps.containsKey(searchMap,'category')}">
					<div class="fl key">商品分类</div>
					<div class="fl value">
						<span th:each="category,categoryStat:${result.categoryList}">
						 <a th:href="@{${url}(category=${category})}" th:text="${category}">手机</a>
						</span>
					</div>
					<div class="fl ext"></div>
				</div>
				<div class="type-wrap logo" th:if="${#maps.containsKey(result,'brandList')} and !${#maps.containsKey(searchMap,'brand')}">
					<div class="fl key brand">品牌</div>
					<div class="value logos">
						<ul class="logo-list">
							<li th:each="brand:${result.brandList}"><a th:href="@{${url}(brand=${brand})}" th:text="${brand}"></li>
						</ul>
					</div>
					<div class="ext">
						<a href="javascript:void(0);" class="sui-btn">多选</a>
						<a href="javascript:void(0);">更多</a>
					</div>
				</div>
				<div class="type-wrap" th:each="spec:${result.specMap}" th:unless="${#maps.containsKey(searchMap,'spec_'+spec.key)}">
					<div class="fl key" th:text="${spec.key}">网络制式</div>
					<div class="fl value">
						<ul class="type-list">
							<li th:each="op:${spec.value}">
								<a th:text="${op}" th:href="@{${url}('spec_'+${spec.key}=${op})}">GSM(移动/联通2G)</a>
							</li>
						</ul>
					</div>
					<div class="fl ext"></div>
				</div>

				<div class="type-wrap" th:unless="${#maps.containsKey(searchMap,'price')}">
					<div class="fl key">价格</div>
					<div class="fl value">
						<ul class="type-list">
							<li>
								<a th:href="@{${url}(price='0-500')}" th:text="0-500元">0-500元</a>
							</li>
							<li>
								<a th:href="@{${url}(price='500-1000')}">500-1000元</a>
							</li>
							<li>
								<a th:href="@{${url}(price='1000-1500')}">1000-1500元</a>
							</li>
							<li>
								<a th:href="@{${url}(price='1500-2000')}">1500-2000元</a>
							</li>
							<li>
								<a th:href="@{${url}(price='2000-3000')}">2000-3000元 </a>
							</li>
							<li>
								<a th:href="@{${url}(price='3000-*')}">3000元以上</a>
							</li>
						</ul>
					</div>
					<div class="fl ext">
					</div>
				</div>
2.8 排序(作业)

上图代码是排序代码,需要2个属性,sortRule:排序规则,ASC或者DESC,sortField:排序的域,前端每次只需要将这2个域的值传入到后台即可实现排序。
(1)后台组装排序URL
每次排序的时候恢复第1页查询,所以url地址我们需要重新拼接,每次切换排序的时候,不需要之前的排序信息,修改SkuController,代码如下:
private String url(Map<String, String> searchMap) {// { spec_网络:"移动4G","keywords":"华为"}
    String url = "/search/list"; // a/b?id=1&
    if (searchMap != null) {
        url += "?";
        for (Map.Entry<String, String> stringStringEntry : searchMap.entrySet()) {
            //如果是排序 则 跳过 拼接排序的地址 因为有数据
            if(stringStringEntry.getKey().equals("sortField") || stringStringEntry.getKey().equals("sortRule")){
                continue;
            }
            url += stringStringEntry.getKey() + "=" + stringStringEntry.getValue() + "&";

        }
        if(url.lastIndexOf("&")!=-1)
            url = url.substring(0, url.lastIndexOf("&"));
    }
    return url;
}
(2)前端排序实现
修改search.html,实现排序,代码如下:
<li>
         <a th:href="@{${url}(sortField=price,sortRule=ASC)}">价格↑</a>
</li>
<li>
		<a th:href="@{${url}(sortField=price,sortRule=DESC)}">价格↓</a>
</li>
这一块我们实现了价格排序,同学们课后去实现以下销量和新品排序。
2.9 分页
真实的分页应该像京东那样,如下图:


(1)分页工具类定义
在dongyimai-common工程中添加Page分页对象,代码如下:
public class Page<T> implements Serializable {

    private List<T> list; // 每页查询出来的数据存放的集合
    private int pageSize = 10; // 每页显示的记录数
    private int pageNo; // 当前页,通过用户传入
    //	private int totalPageNo; // 总页数,通过计算得到
    private long totalRecord; // 总记录数,通过查询数据库得到

    private int firstPage;    //分页页码集合起始记录

    private int lastPage;      //分页页码集合结束记录

    private int maxPage;  //分页最大页码

    private boolean firstDot = true;
    private boolean lastDot = true;


    public Page() {

    }

    public Page(long totalRecord,int pageNo,int pageSize) {
        this.pageSize = pageSize;
        this.totalRecord = totalRecord;
        this.pageNo = pageNo;
        this.firstPage = 1;
        this.lastPage = (int)this.getTotalPageNo();
        this.maxPage = (int)this.getTotalPageNo();
        setPageLabel();
    }

    public List<T> getList() {
        return list;
    }

    public void setList(List<T> list) {
        this.list = list;
    }

    public long getPageNo() {
        if (pageNo < 1) {
            // 如果当前页码小于1,直接返回1
            return 1;
        } else if (pageNo > getTotalPageNo()) {
            // 如果当前页码大于总页数,返回总页数
            return getTotalPageNo();
        } else {
            return pageNo;
        }
    }

    public void setPageNo(int pageNo) {
        this.pageNo = pageNo;
    }

    // 总页数是由总记录数和每页显示的条数计算得到
    public long getTotalPageNo() {
        if (totalRecord % pageSize == 0) {
            return totalRecord / pageSize;
        } else {
            return totalRecord / pageSize + 1;
        }
    }


    public void setPageLabel(){
        if(maxPage>5){
            if(pageNo<=3){
                lastPage = 5;
                firstDot = false;
            }else if(pageNo>=maxPage-2){
                firstPage = maxPage-4;
                lastDot = false;
            }else{
                firstPage = pageNo-2;
                lastPage = pageNo+2;
            }
        }else{
            firstDot = false;
            lastDot = false;
        }
    }

    public int getFirstPage(){
        return this.firstPage;
    }
    public int getLastPage(){
        return this.lastPage;
    }

    // public void setTotalPageNo(int totalPageNo) {
    // this.totalPageNo = totalPageNo;
    // }

    public long getTotalRecord() {
        return totalRecord;
    }

    public void setTotalRecord(int totalRecord) {
        this.totalRecord = totalRecord;
    }

    public int getPageSize() {
        return pageSize;
    }

    // 判断是否有上一页
    public boolean hasPrev() {
        return getPageNo() > 1;
    }

    // 获取上一页
    public long getPrev() {
        return hasPrev() ? getPageNo() - 1 : 1;
    }

    // 判断是否有下一页
    public boolean hasNext() {
        return getPageNo() < getTotalPageNo();
    }

    // 获取下一页
    public long getNext() {
        return hasNext() ? getPageNo() + 1 : getTotalPageNo();
    }

    public boolean isFirstDot(){
        return this.firstDot;
    }
    public boolean isLastDot(){
        return this.lastDot;
    }


}
(2)分页实现
由于这里需要获取分页信息,我们可以在dongyimai-search-service服务中修改搜索方法实现获取分页数据,修改com.offcn.search.service.impl.SkuServiceImpl的search方法,在return之前添加如下方法获取份额与数据:
//分页数据保存
//设置当前页码
resultMap.put("pageNum", pageNum);
resultMap.put("pageSize", 30);
修改SkuController,实现分页信息封装,代码如下:
//5.创建一个分页的对象  可以获取当前页 和总个记录数和显示的页码(以当前页为中心的5个页码)
        Page<SkuInfo> infoPage = new Page<SkuInfo>(
                Long.valueOf(resultMap.get("total").toString()),
                Integer.valueOf(resultMap.get("pageNum").toString()),
                Integer.valueOf(resultMap.get("pageSize").toString())
        );
       model.addAttribute("page",infoPage);
(3)页面分页实现
修改search.html,实现分页查询,代码如下:
<div class="fr page">
<div class="sui-pagination pagination-large">
<ul>
<li class="prev">
<a href="#" th:if="${page.pageNo>1}" th:href="@{${url}(pageNum=${page.prev})}">«上一页</a>
</li>
<li class="dotted"><span th:if="${page.firstDot}">...</span></li>
<li th:class="${page.pageNo}==${i}?'active':''" th:each="i:${#numbers.sequence(page.firstPage,page.lastPage)}">
<a href="#" th:href="@{${url}(pageNum=${i})}" th:text="${i}">1</a>
</li>
<li class="dotted"><span th:if="${page.lastDot}">...</span></li>
<li class="next">
<a href="#" th:if="${page.pageNo<page.next}" th:href="@{${url}(pageNum=${page.next})}">下一页»</a>
</li>
</ul>
<div><span>共<i th:text="${page.totalPageNo}"></i>页 </span></div>
</div>
</div>
注意:每次如果搜条件发生变化都要从第1页查询,而点击下一页的时候,分页数据在页面给出,不需要在后台拼接的url中给出,所以在拼接url的时候,需要过滤掉分页参数,修改dongyimai-search-web的控制层com.offcn.search.controller.SkuController的url拼接方法,代码如下:
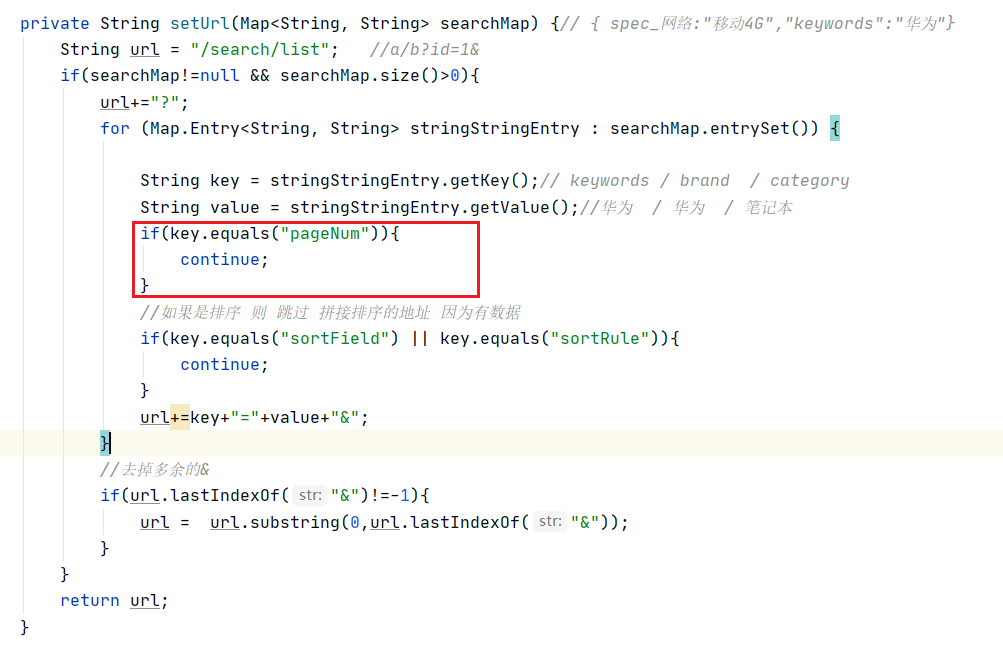
测试效果:
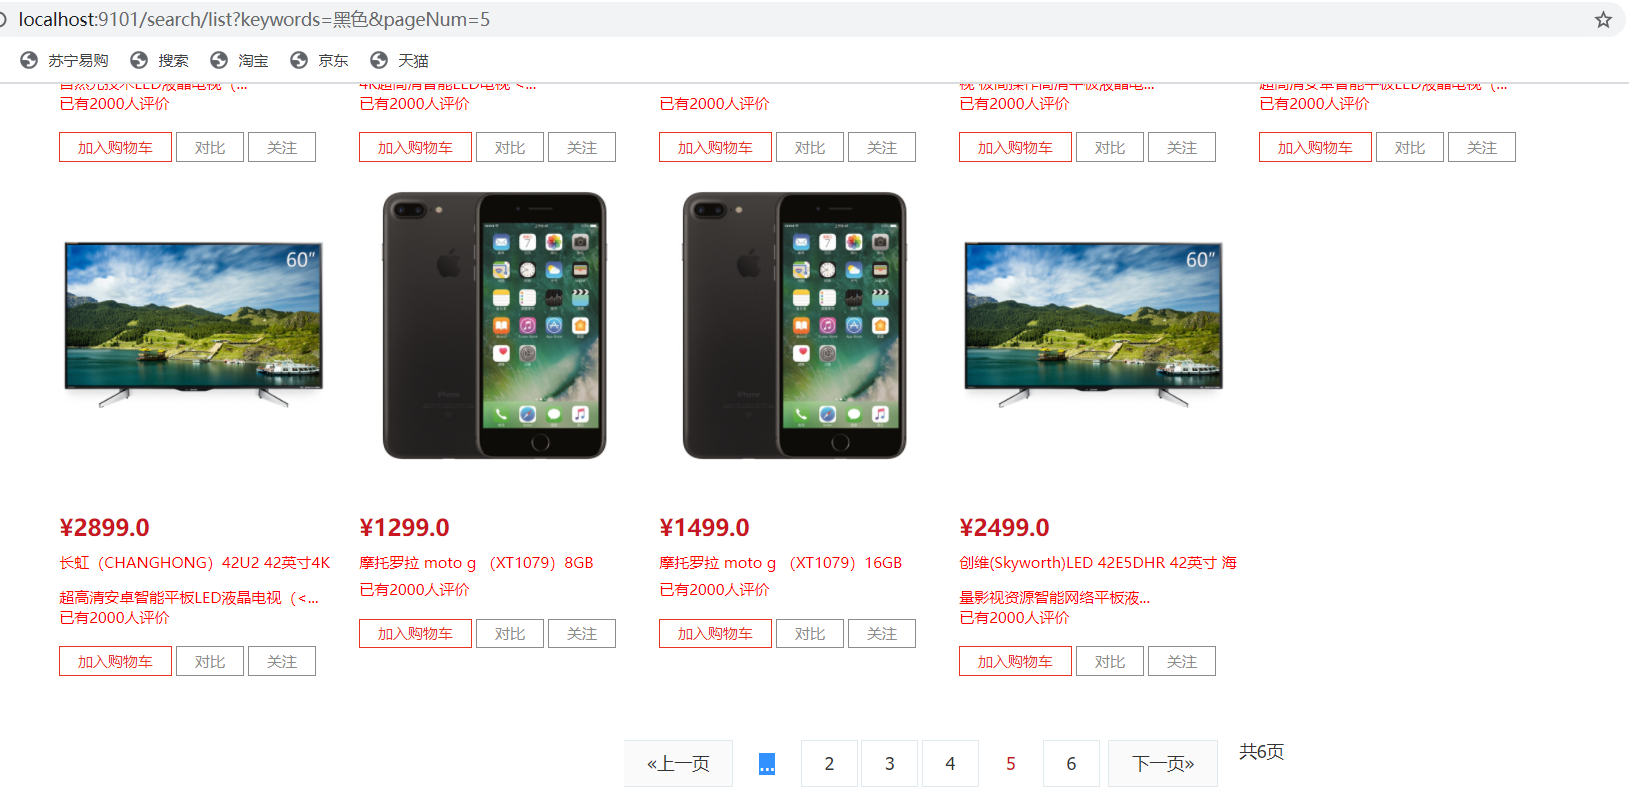
三 东易买商品详情页
1 为什么要使用网页静态化技术
网页静态化解决方案在实际开发中运用比较多,例如新闻网站,门户网站中的新闻频道或者是文章类的频道。
 对于电商网站的商品详细页来说,至少几百万个商品,每个商品又有大量的信息,这样的情况同样也适用于使用网页静态化来解决。
网页静态化技术和缓存技术的共同点都是为了减轻数据库的访问压力,但是具体的应用场景不同,缓存比较适合小规模的数据,而网页静态化比较适合大规模且相对变化不太频繁的数据。另外网页静态化还有利于SEO。
另外我们如果将网页以纯静态化的形式展现,就可以使用Nginx这样的高性能的web服务器来部署,Nginx可以承载5万的并发,而Tomcat只有几百。
今天我们就研究网页静态化技术
2 需求分析
当系统审核完成商品,需要将商品详情页进行展示,那么采用静态页面生成的方式生成,并部署到高性能的web服务器中进行访问是比较合适的。所以,开发流程如下图所示:
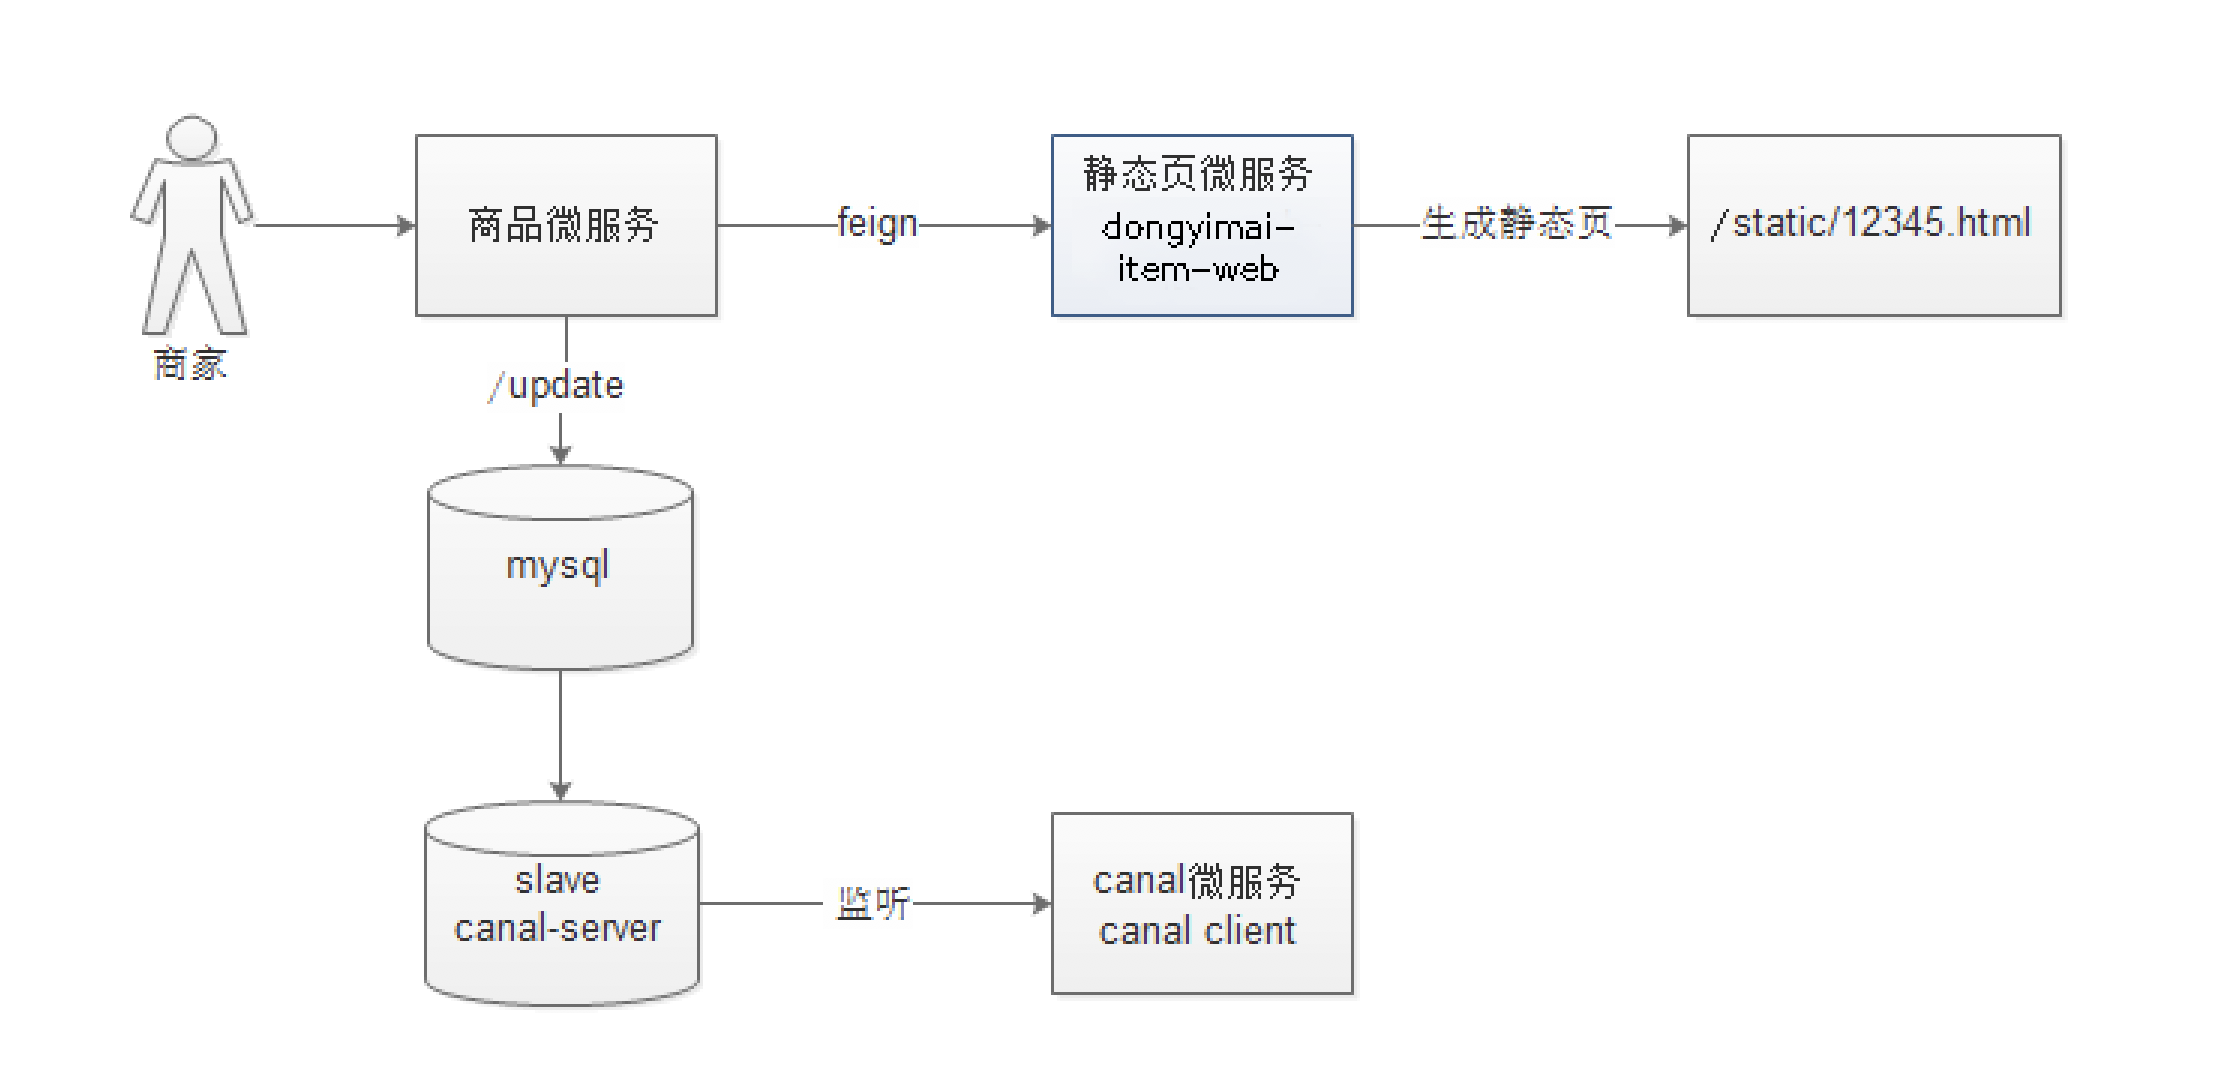
执行步骤解释:
- 系统管理员(商家运维人员)修改或者审核商品的时候,会触发canal监控数据
- canal微服务获取修改数据后,调用静态页微服务的方法进行生成静态页
- 静态页微服务只负责使用thymeleaf的模板技术生成静态页
3 商品静态化微服务创建
3.1 搭建项目
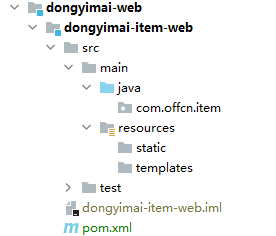
(1)在dongyimai-web下创建一个名称为dongyimai-item-web的模块,该微服务只用于生成商品静态页,如图:
(2)dongyimai-item-web中添加起步依赖,如下
<?xml version="1.0" encoding="UTF-8"?>
<project xmlns="http://maven.apache.org/POM/4.0.0"
         xmlns:xsi="http://www.w3.org/2001/XMLSchema-instance"
         xsi:schemaLocation="http://maven.apache.org/POM/4.0.0 http://maven.apache.org/xsd/maven-4.0.0.xsd">
    <parent>
        <artifactId>dongyimai-web</artifactId>
        <groupId>com.offcn</groupId>
        <version>1.0</version>
    </parent>
    <modelVersion>4.0.0</modelVersion>

    <artifactId>dongyimai-item-web</artifactId>

       <dependencies>
        <dependency>
            <groupId>com.offcn</groupId>
            <artifactId>dongyimai-sellergoods-serivce-api</artifactId>
            <version>1.0</version>
            <exclusions>
                <exclusion>
                    <groupId>com.alibaba</groupId>
                    <artifactId>druid-spring-boot-starter</artifactId>
                </exclusion>
            </exclusions>
        </dependency>
        <dependency>
            <groupId>org.springframework.boot</groupId>
            <artifactId>spring-boot-starter-thymeleaf</artifactId>
        </dependency>

    </dependencies>

</project>
(3)修改application.yml的配置
server:
  port: 9102
eureka:
  client:
    service-url:
      defaultZone: http://127.0.0.1:8761/eureka
  instance:
    prefer-ip-address: true

spring:
  thymeleaf:
    cache: false
  application:
    name: item-web
  main:
    allow-bean-definition-overriding: true
feign:
  hystrix:
    enabled: true
  client:
    config:
      default:
        connectTimeout: 10000 #连接超时配置
        readTimeout: 60000 #执行超时配置
#设定Hystrix熔断超时时间 ,理论上熔断时间应该大于总连接超时时间
hystrix:
  command:
    default:
      execution:
        isolation:
          thread:
            timeoutInMilliseconds: 6000

# 生成静态页的位置
pagepath: C:\\items
(4)创建系统启动类
@SpringBootApplication(exclude = {DataSourceAutoConfiguration.class})
@EnableEurekaClient
@EnableFeignClients(basePackages = "com.offcn.sellergoods.feign")
public class ItemApplication {
    public static void main(String[] args) {
        SpringApplication.run(ItemApplication.class,args);
    }

}
3.2 生成静态页
3.2.1 需求分析
页面发送请求,传递要生成的静态页的的商品的SpuID.后台controller 接收请求,调用thyemleaf的原生API生成商品静态页。
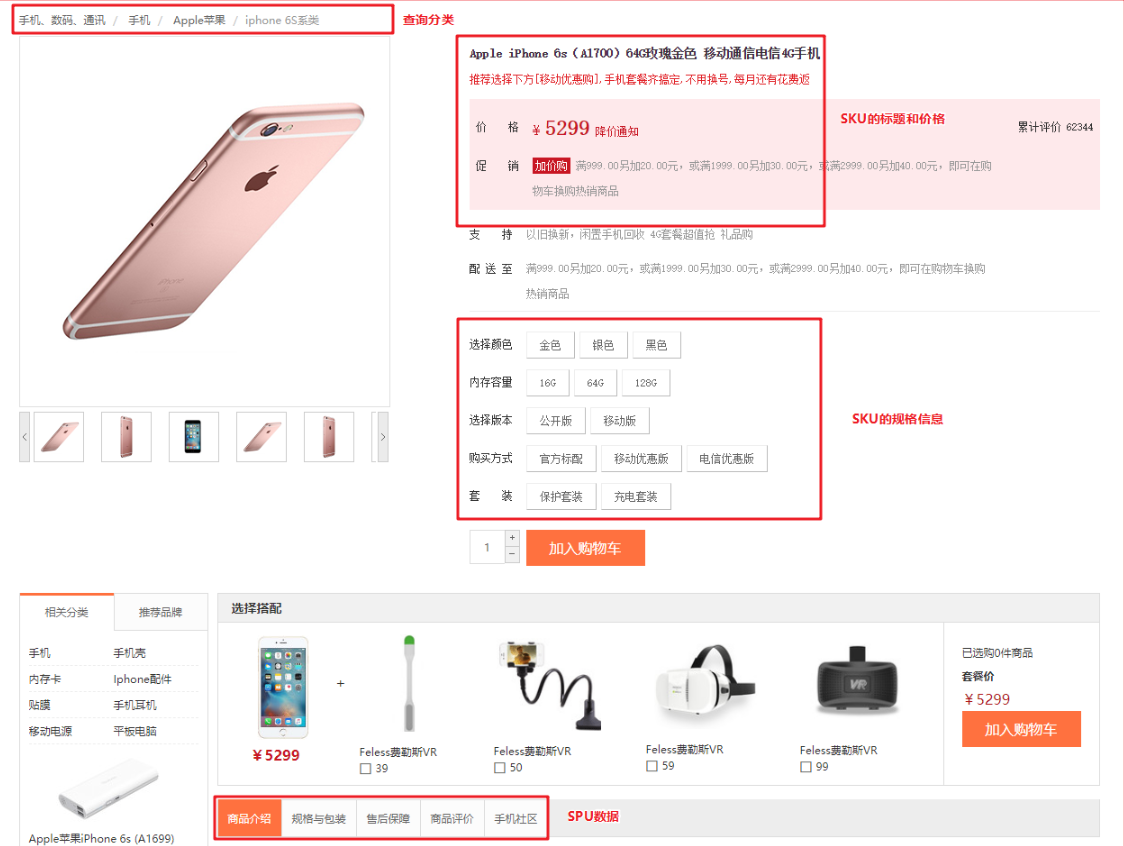
上图是要生成的商品详情页,从图片上可以看出需要查询SPU的3个分类作为面包屑显示,同时还需要查询SKU和SPU信息。
3.2.2 Feign创建
稍后需要查询SPU和SKU以及Category,所以我们需要先创建Feign。
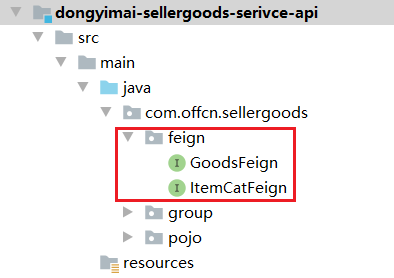
修改dongyimai-sellergoods-service-api,添加ItemCatFeign,并在ItemCatFeign中添加根据ID查询分类数据,代码如下:
@FeignClient(name="sellergoods")
@RequestMapping("/itemCat")
public interface ItemCatFeign {

    /**
     * 获取分类的对象信息
     * @param id
     * @return
     */
    @GetMapping("/{id}")
    public Result<ItemCat> findById(@PathVariable(name = "id") Integer id);
}
在dongyimai-sellergoods-service-api,添加GoodsFeign,并添加根据SpuID查询Spu信息,代码如下:
@FeignClient(name="sellergoods")
@RequestMapping("/goods")
public interface GoodsFeign {
    /***
     * 根据ID查询Spu数据
     * @param id
     * @return
     */
    @GetMapping("/{id}")
    Result<GoodsEntity> findById(@PathVariable Long id);
}
3.2.3 静态页生成代码
(1) 创建service
在项目dongyimai-item-web中创建接口 com.offcn.item.service.PageService
接口:PageService
public interface PageService {
    /**
     * 根据商品的ID 生成静态页
     * @param spuId
     */
    public void createPageHtml(Long spuId) ;
}
在项目dongyimai-item-web中创建实现类 com.offcn.item.service.impl.PageServiceImpl实现类,代码如下:
@Service
public class PageServiceImpl implements PageService {
    @Autowired
    private GoodsFeign goodsFeign;

    @Autowired
    private ItemCatFeign itemCatFeign;

    @Autowired
    private TemplateEngine templateEngine;

    //生成静态文件路径
    @Value("${pagepath}")
    private String pagepath;

    /**
     * 构建数据模型
     * @param spuId
     * @return
     */
    private Map<String,Object> buildDataModel(Long spuId){
        //构建数据模型
        Map<String, Object> dataMap = new HashMap<>();
        //获取SPU 和SKU列表
        Result<GoodsEntity> result = goodsFeign.findById(spuId);
        GoodsEntity goodsEntity = result.getData();
        //1.加载SPU数据
        Goods goods = goodsEntity.getGoods();
        //2.加载商品扩展数据
        GoodsDesc goodsDesc = goodsEntity.getGoodsDesc();

        //3.加载SKU数据
        List<Item> itemList = goodsEntity.getItemList();

        dataMap.put("goods", goods);

        dataMap.put("goodsDesc", goodsDesc);
        dataMap.put("specificationList", JSON.parseArray(goodsDesc.getSpecificationItems(),Map.class));
        dataMap.put("imageList",JSON.parseArray(goodsDesc.getItemImages(),Map.class));
        dataMap.put("itemList",itemList);

        //4.加载分类数据
        dataMap.put("category1",itemCatFeign.findById(goods.getCategory1Id().intValue()).getData());
        dataMap.put("category2",itemCatFeign.findById(goods.getCategory2Id().intValue()).getData());
        dataMap.put("category3",itemCatFeign.findById(goods.getCategory3Id().intValue()).getData());


        return dataMap;
    }

    /***
     * 生成静态页
     * @param spuId
     */
    @Override
    public void createPageHtml(Long spuId) {
        // 1.上下文
        Context context = new Context();
        Map<String, Object> dataModel = buildDataModel(spuId);
        context.setVariables(dataModel);
        // 2.准备文件
        File dir = new File(pagepath);
        if (!dir.exists()) {
            dir.mkdirs();
        }
        File dest = new File(dir, spuId + ".html");
        // 3.生成页面
        try (PrintWriter writer = new PrintWriter(dest, "UTF-8")) {
            templateEngine.process("item", context, writer);
        } catch (Exception e) {
            e.printStackTrace();
        }
    }
}
(2)创建Controller
在dongyimai-item-web中创建com.offcn.item.controller.PageController用于接收请求,测试生成静态页
@RestController
@RequestMapping("/page")
public class PageController {

    @Autowired
    private PageService pageService;

    /**
     * 生成静态页面
     * @param id
     * @return
     */
    @RequestMapping("/createHtml/{id}")
    public Result createHtml(@PathVariable(name="id") Long id){
        pageService.createPageHtml(id);
        return new Result(true, StatusCode.OK,"ok");
    }
}
(3)拷贝模板文件 资料/网站前台/item.html
3.2.4 模板填充
首先将模板 将资料/网站前台/item.html 拷贝到 resources/templates/下
添加thymeleaf的头
修改thymeleaf命名头
<html xmlns:th="http://www.thymeleaf.org">
(1)面包屑数据的实现

修改item.html,填充三个分类数据作为面包屑,代码如下:
<div class="crumb-wrap">
		<ul class="sui-breadcrumb">
			<li>
				<a href="#" th:text="${category1.name}"></a>
			</li>
			<li>
				<a href="#" th:text="${category2.name}"></a>
			</li>
			<li>
				<a href="#" th:text="${category3.name}"></a>
			</li>
		</ul>
</div>
(2)商品图片

修改item.html,将商品图片信息输出,在真实工作中需要做空判断,代码如下:
<div class="fl preview-wrap">
<!--放大镜效果-->
<div class="zoom">
<!--默认第一个预览-->
<div id="preview" class="spec-preview">
<span class="jqzoom"><img th:jqimg="${imageList[0].url}" th:src="${imageList[0].url}" width="400px"/></span>
</div>
<!--下方的缩略图-->
<div class="spec-scroll">
<a class="prev"><</a>
<!--左右按钮-->
<div class="items">
<ul>
<li th:each="img:${imageList}"><img th:src="${img.url}" th:bimg="${img.url}" onmousemove="preview(this)"/></li>
</ul>
</div>
<a class="next">></a>
</div>
</div>
</div>
(3)规格输出
<div id="specification" class="summary-wrap clearfix">
<!--循环MAP-->
<dl th:each="spec,specStat:${specificationList}">
<dt>
<div class="fl title">
<i th:text="${spec.attributeName}"></i>
</div>
</dt>
<dd th:each="arrValue:${spec.attributeValue}">
<a href="javascript:;">
<i th:text="${arrValue}"></i>
<span title="点击取消选择"> </span>
</a>
</dd>
</dl>
</div>
(4)默认SKU显示
静态页生成后,需要显示默认的Sku,我们这里默认显示第1个Sku即可,这里可以结合着Vue一起实现。可以先定义一个集合,再定义一个spec和sku,用来存储当前选中的Sku信息和Sku的规格,代码如下:
需要在页面引入vue.js
<script src="js/vue.js"></script>
设置绑定vue节点
<!--页面顶部 结束-->
<div class="py-container" id="itemArray">
<script th:inline="javascript">
    var item = new Vue({
        el: '#itemArray',
        data: {
            skuList: [[${itemList}]],
            sku: {},
            spec: {}
        },
        created: function () {
            this.sku = JSON.parse(JSON.stringify(this.skuList[0]));
            this.spec = JSON.parse(this.skuList[0].spec);
        }
     })
</script>
页面显示默认的Sku信息
 <div class="sku-name">
                    <h4>{{sku.title}}</h4>
                </div>
                <div class="news"><span th:text="${goods.caption}"></span></div>
                <div class="summary">
                    <div class="summary-wrap">
                        <div class="fl title">
                            <i>价  格</i>
                        </div>
                        <div class="fl price">
                            <i>¥</i>
                            <em>{{sku.price}}</em>
                            <span>降价通知</span>
                        </div>
                        <div class="fr remark">
                            <i>累计评价</i><em>612188</em>
                        </div>
                    </div>
                    ………………
</div>
(5)默认SKU显示
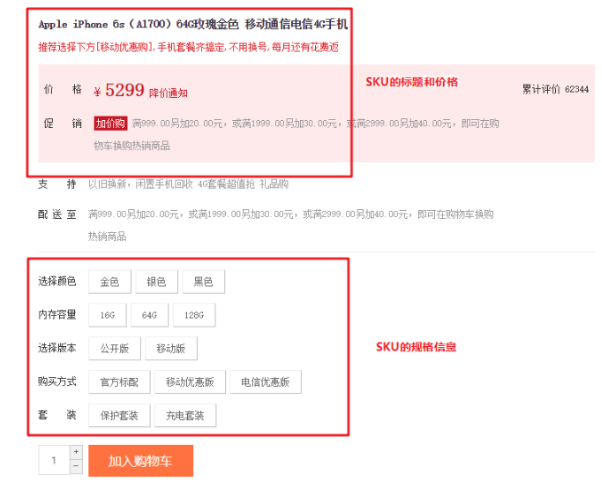
静态页生成后,需要显示默认的Sku,我们这里默认显示第1个Sku即可,这里可以结合着Vue一起实现。可以先定义一个集合,再定义一个spec和sku,用来存储当前选中的Sku信息和Sku的规格,代码如下:
<script th:inline="javascript">
    var item = new Vue({
        el: '#itemArray',
        data: {
            skuList: [[${itemList}]],
            sku: {},
            spec: {}
        },
        created: function () {
            this.sku = JSON.parse(JSON.stringify(this.skuList[0]));
            //注意这里是直接把json字符串转换为对象
            this.spec = JSON.parse(this.skuList[0].spec);
        }
     })
</script>
注意:th:inline=“javascript"这是Thymeleaf中的内联写法,支持在javascript访问model中的数据,所以有[[${xxx.xxx}]]这样写法(Javascript中访问thymeleaf变量值)的时候一定要记得在script中写上th:inline=“javascript"这样才成功访问。
位置如下:

页面显示默认的Sku信息
  <div class="fr itemInfo-wrap" id="itemArray">
    <div class="sku-name">
        <h4>{{sku.title}}</h4>
    </div>
    <div class="news"><span th:text="${goods.caption}"></span></div>
    <div class="summary">
        <div class="summary-wrap">
            <div class="fl title">
                <i>价  格</i>
            </div>
            <div class="fl price">
                <i>¥</i>
                <em>{{sku.price}}</em>
                <span>降价通知</span>
            </div>
            <div class="fr remark">
                <i>累计评价</i><em>612188</em>
            </div>
        .......
   </div>
</div>
<!--product-detail-->
(6)记录选中的Sku
在当前Spu的所有Sku中spec值是唯一的,我们可以根据spec来判断用户选中的是哪个Sku,我们可以在Vue中添加代码来实现,代码如下:
 methods: {
            selectSpecification: function (specName, specValue) {
                //选中的spec信息,且触发视图更新
                this.$set(this.spec, specName, specValue);
                //循环匹配
                for (var i = 0; i < this.skuList.length; i++) {
                    //匹配规格是否相同,如果相同,则表明选中的是该SKU
                    if (this.matchObject(JSON.parse(this.skuList[i].spec), this.spec)) {
                        this.sku = this.skuList[i];
                        return;
                    }
                }
                //如果上面执行完毕,没有找到SKU,则提示下架操作
                this.sku = {'id':0,'title':'提示:该商品已经下架','price':0};
            },
            matchObject: function (map1, map2) {
                for (var k in map1) {
                    if (map1[k] != map2[k]) {
                        return false;
                    }
                }
                for (var k in map2) {
                    if (map2[k] != map1[k]) {
                        return false;
                    }
                }

                return true;
            }
}
添加规格点击事件
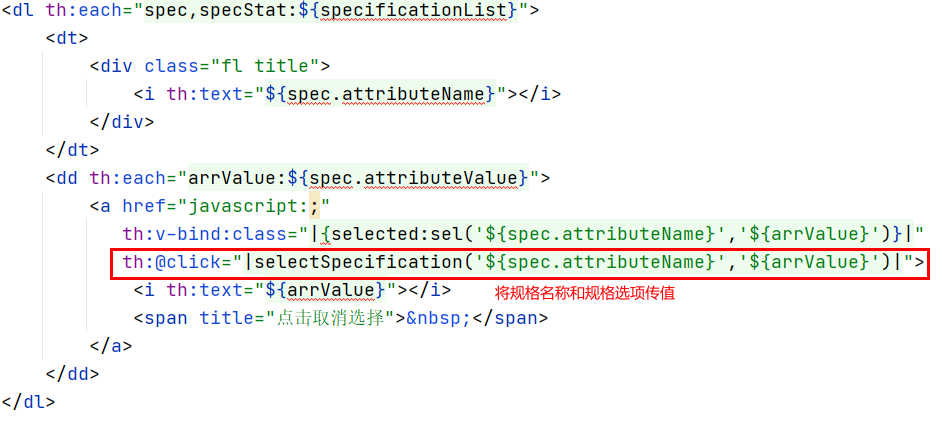
<a href="javascript:;" th:@click="|selectSpecification('${spec.attributeName}','${arrValue}')|" th:v-bind:class="|{selected:sel('${spec.attributeName}','${arrValue}')}|">[[${arrValue}]]<span title="点击取消选择"> </span>
</a>
(6)样式切换
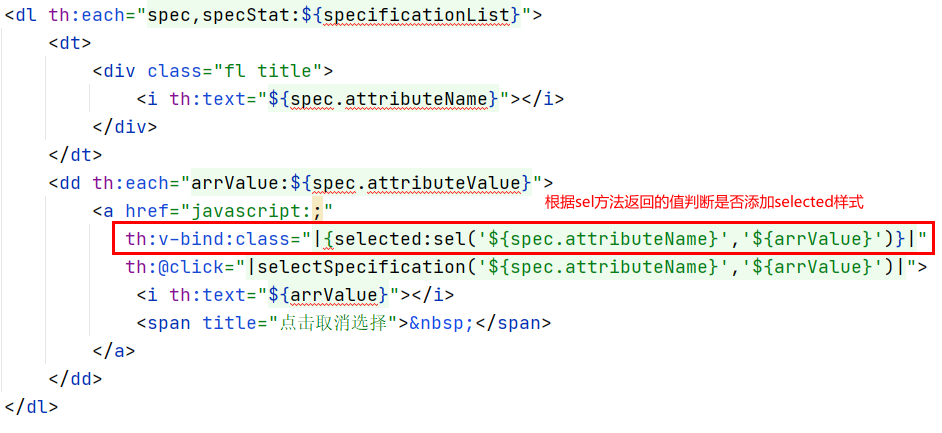
点击不同规格后,实现样式选中,我们可以根据每个规格判断该规格是否在当前选中的Sku规格中,如果在,则返回true添加selected样式,否则返回false不添加selected样式。
Vue添加代码:
 sel: function (name, value) {
                if (this.spec == undefined) {
                    return false;
                }
                if (this.spec[name] == value) {
                    return true;
                } else {
                    return false;
                }
      }
页面添加样式绑定,代码如下:
完整的vue代码如下:
<script th:inline="javascript">
    var item = new Vue({
        el: '#itemArray',
        data: {
            skuList: [[${itemList}]],
            sku: {},
            spec: {}
        },
        created: function () {
            this.sku = JSON.parse(JSON.stringify(this.skuList[0]));
            this.spec = JSON.parse(this.skuList[0].spec);
        },
        methods: {
            sel: function (name, value) {
                if (this.spec == undefined) {
                    return false;
                }
                if (this.spec[name] == value) {
                    return true;
                } else {
                    return false;
                }
            },
            selectSpecification: function (specName, specValue) {
                //选中的spec信息
                this.$set(this.spec, specName, specValue);
                //循环匹配
                for (var i = 0; i < this.skuList.length; i++) {
                    //匹配规格是否相同,如果相同,则表明选中的是该SKU
                    if (this.matchObject(JSON.parse(this.skuList[i].spec), this.spec)) {
                        this.sku = this.skuList[i];
                        return;
                    }
                }
                //如果上面执行完毕,没有找到SKU,则提示下架操作
                this.sku = {'id':0,'title':'提示:该商品已经下架','price':0};
            },
            matchObject: function (map1, map2) {
                for (var k in map1) {
                    if (map1[k] != map2[k]) {
                        return false;
                    }
                }
                for (var k in map2) {
                    if (map2[k] != map1[k]) {
                        return false;
                    }
                }

                return true;
            }
        }


    })
</script>
3.2.5 启动测试
启动eureka服务端 dongyimai-eureka
启动商品微服务 dongyimai-sellergoods-service
启动静态化微服务 dongyimai-item-web
将静态资源导入到C:\items目录下中,如下图:
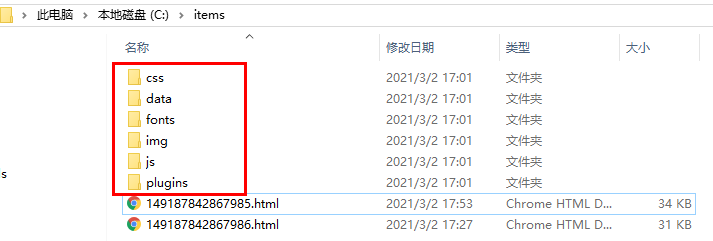
这样生成静态页面到给地址的时候就可以有正确的样式等信息了。
开始生成静态页面:
访问生成静态页地址 http://localhost:9102/page/createHtml/149187842867985

注意: 此处一定要使用一个有效的数据信息才可以实现效果。如果数据库中的商品的数据信息不完整将不能正常生成页面数据。
静态页生成后在生成目录中访问页面,效果如下:
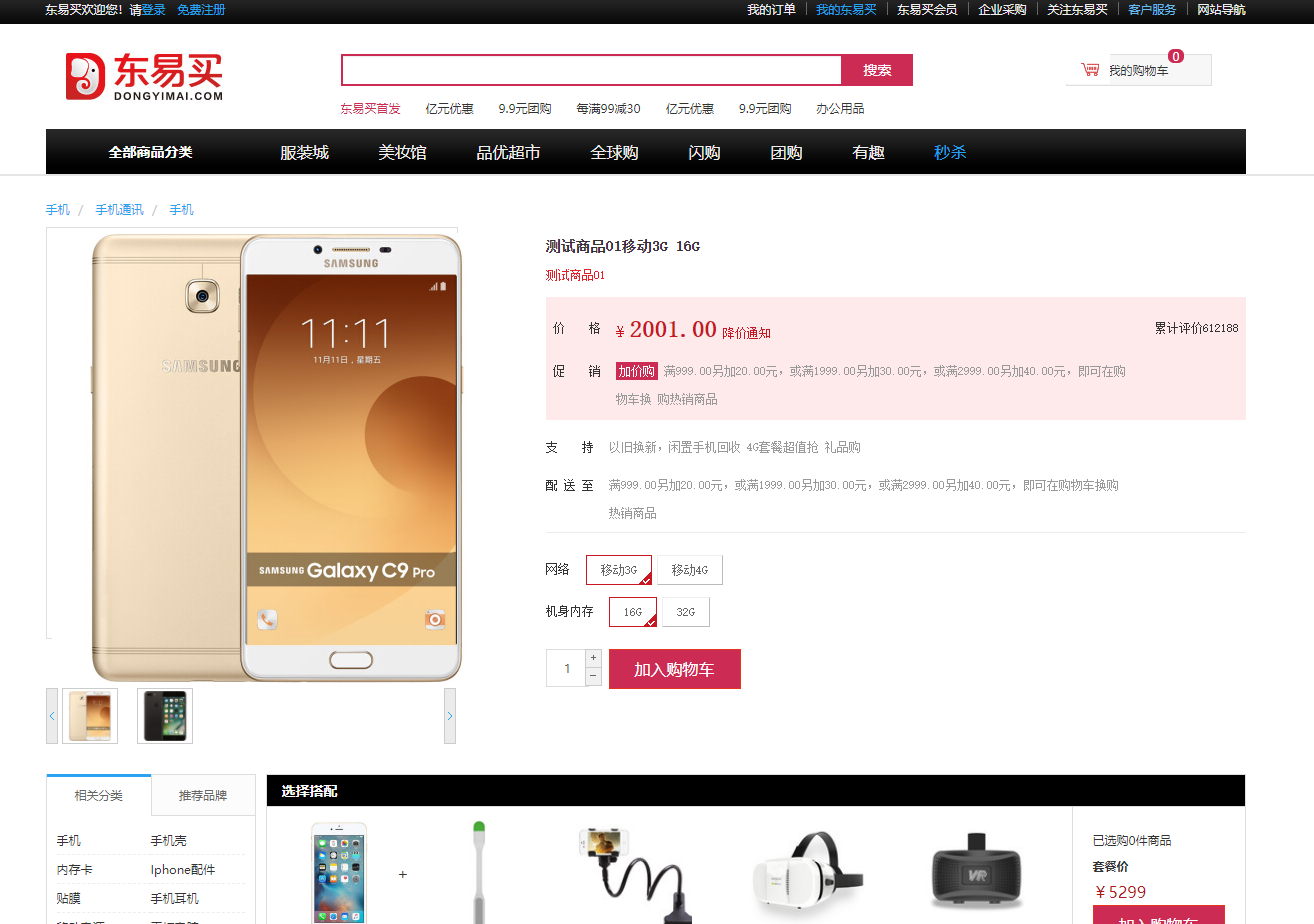
这样后续我们将这些生成的静态网页部署到Nginx下,就可以直接访问了。
四 canal监听生成静态页
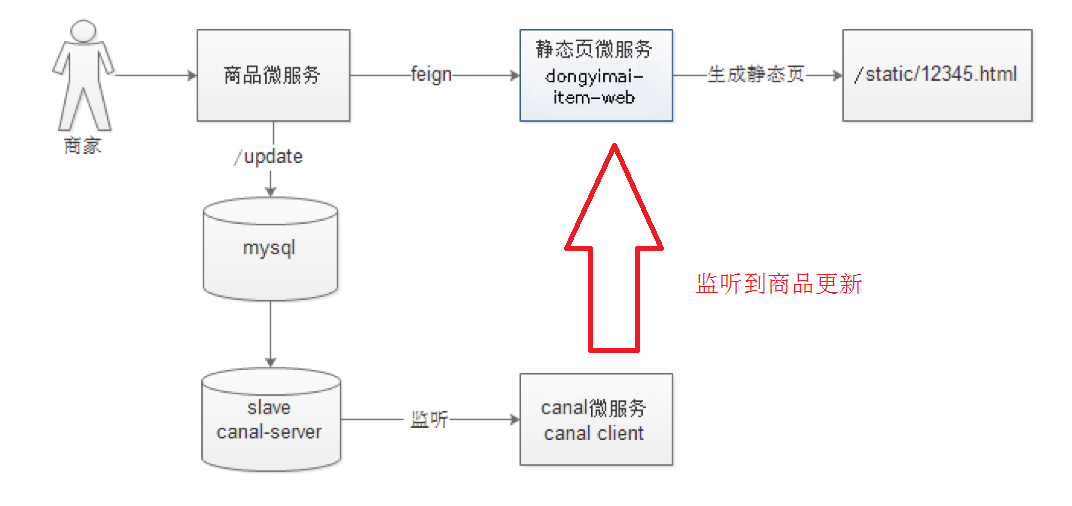
监听到数据的变化,直接调用feign 生成静态页即可.
目前,已经完成使用静态页微服务,接收传递的商品spuId 通过Fegin调用商品微服务获取商品数据,以及商品分类数据, 实现商品详情页的生成。
接下需要实现就是使用canal 动态监控数据库中商品数据的变化,比如: 商品审核通过了,canal监听到商品数据发生变化,就会调用 静态页微服务并传递spuId, 接下来静态页微服务就生成静态页。
1 需求分析
当商品微服务审核商品之后,应当发送消息,这里采用了Canal监控数据变化,数据变化后,调用feign实现生成静态页
2 Feign创建
在dongyimai-service-api中创建dongyimai-item-web-api,该工程中主要创建dongyimai-item-web的对外依赖抽取信息。
(1)Feign创建
在dongyimai-item-web-api中创建com.offcn.item.feign.PageFeign,代码如下:
@FeignClient(name="item-web")
@RequestMapping("/page")
public interface PageFeign {

    /***
     * 根据SpuID生成静态页
     * @param id
     * @return
     */
    @RequestMapping("/createHtml/{id}")
    Result createHtml(@PathVariable(name="id") Long id);
}
(2)pom.xml依赖
修改dongyimai-canal-service工程的pom.xml,引入如下依赖:
<!--静态页API 服务-->
<dependency>
    <groupId>com.offcn</groupId>
    <artifactId>dongyimai-item-web-api</artifactId>
    <version>1.0</version>
    <exclusions>
      <exclusion>
          <groupId>com.alibaba</groupId>
          <artifactId>druid-spring-boot-starter</artifactId>
       </exclusion>
   </exclusions>
</dependency>
(3)修改dongyiami-canal-service工程中的启动类

@SpringBootApplication(exclude={DataSourceAutoConfiguration.class})
@EnableEurekaClient
@EnableCanalClient
@EnableFeignClients(basePackages = {"com.offcn.content.feign","com.offcn.item.feign"})
public class CanalApplication {

    public static void main(String[] args) {
        SpringApplication.run(CanalApplication.class,args);
    }
}
3 canal监听数据变化
监听类中,监听商品数据库的tb_goods的数据变化,当数据变化的时候生成静态页或者删除静态页
在原来的监听类中添加如下代码即可,
@Autowired
private PageFeign pageFeign;

@ListenPoint(destination = "example",
        schema = "dongyimaidb",
        table = {"tb_goods"},
        eventType = {CanalEntry.EventType.UPDATE, CanalEntry.EventType.INSERT, CanalEntry.EventType.DELETE})
public void onEventCustomSpu(CanalEntry.EventType eventType, CanalEntry.RowData rowData) {

    //判断操作类型
    if (eventType == CanalEntry.EventType.DELETE) {
        String goodsId = "";
        List<CanalEntry.Column> beforeColumnsList = rowData.getBeforeColumnsList();
        for (CanalEntry.Column column : beforeColumnsList) {
            if (column.getName().equals("id")) {
                goodsId = column.getValue();//goodsId
                break;
            }
        }
        //todo 删除静态页

    }else{
        //新增 或者 更新
        List<CanalEntry.Column> afterColumnsList = rowData.getAfterColumnsList();
        String goodsId = "";
        for (CanalEntry.Column column : afterColumnsList) {
            if (column.getName().equals("id")) {
                goodsId = column.getValue();
                break;
            }
        }
        //更新 生成静态页
        pageFeign.createHtml(Long.valueOf(goodsId));
    }
}
4.具体演示可以新增一个商品数据,然后后在监听的时候打印一个数据语句便于观察效果。
新增之后,可以看到 dongyimai-canal-service,打印如下输出语句

查看静态页面目录发现生成了静态页面。