Spring Boot第一节
一、Spring Boot概述
(一)微服务概述
1、微服务
微服务(英语:Microservices)是一种软件架构风格,它是以专注于单一责任与功能的小型功能区块 (Small Building Blocks) 为基础,利用模块化的方式组合出复杂的大型应用程序,各功能区块使用与语言无关 (Language-Independent/Language agnostic)的API集相互通信;2014年,Martin Fowler 与 James Lewis 共同提出了微服务的概念,定义了微服务是以开发一组小型服务的方式来开发一个独立的应用系统的。其中每个小型服务都运行在自己的进程中,并经常采用HTTP资源API这样轻量的机制来相互通信。这些服务围绕业务功能进行构建,并能通过全自动的部署机制来进行独立部署。这些微服务可以使用不同的语言来编写,并且可以使用不同的数据存储技术。对这些微服务我们仅做最低限度的集中管理。

把大型的项目按功能模块进行拆分,每个模块可以构建一个springBoot项目。
2、单体应用
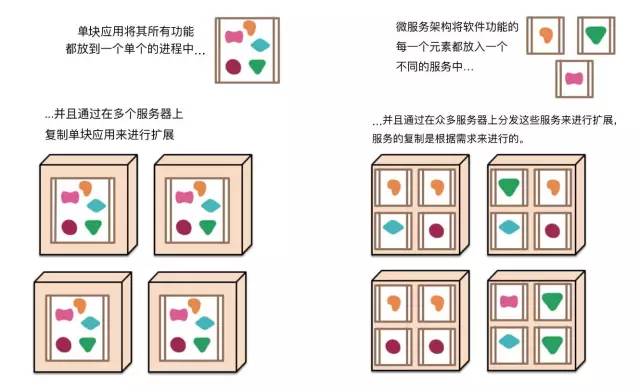
(1)单体应用:一个单块应用系统是以一个单个单元的方式来构建的。企业应用系统经常包含三个主要部分:客户端用户界面、数据库和服务端应用系统,这里的服务端应用系统就是一个单体的应用,系统中任意逻辑发生变化都会导致重新构建部署一个新版本的服务端应用系统。针对单体应用,当访问量变大时,通常采用负载均衡,横向扩展的方式将多个单体应用部署到多个服务器上访问。
(2)单体应用缺点:
软件变更受到了很大的限制,应用系统的一个很小的部分的一处变更,也需要将整个单块应用系统进行重新构建和部署。不能根据用户需求部署应用系统中的功能模块,只能扩展部署整个应用系统。
3、单体应用和微服务对比
4、微服务应用搭建
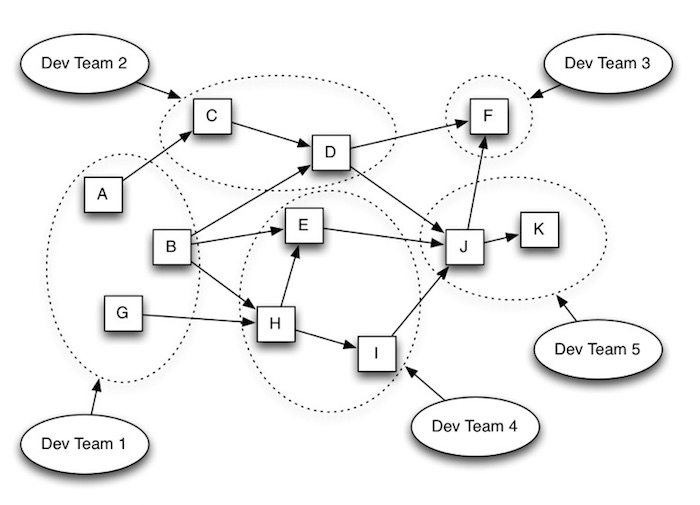
要搭建一个微服务,运维和部署都变得非常复杂,spring提供了一套解决方案:
springBoot:快速构建单个服务;
springcloud:是一系列有序框架的集合,其主要的设施有,服务发现与注册,配置中心,消息总线,负载均衡,断路器,数据监控等,通过Spring Boot的方式,可以实现一键启动,和部署。
Spring cloud data flow: 为基于微服务的分布式流处理和批处理数据通道提供了一系列模型和最佳实践.

(二)Spring Boot简介
Spring-Boot是由Pivotal团队提供的全新框架,其设计目的是用来简化新Spring应用的初始搭建以及开发过程。个人理解来说Spring-Boot其实不是什么新的框架,它默认配置了很多框架的使用方式,就像maven整合了所有的jar包,Spring-Boot整合了其他相关联框架。
(三)Spring Boot的优势
1、快速构建项目。
2、对主流开发框架的无配置集成。
3、项目可独立运行,无须外部依赖Servlet容器。
4、提供运行时的应用监控。
5、极大的提高了开发、部署效率。
6、与云计算的天然集成。
(四)Spring Boot的核心功能介绍
1、独立运行Spring项目
	Spring Boot 可以以jar包形式独立运行,运行一个Spring Boot项目只需要通过java -jar xx.jar来运行。
2、内嵌servlet容器
    Spring Boot可以选择内嵌Tomcat、jetty或者Undertow,这样我们无须以war包形式部署项目。
3、提供starter简化Maven配置
    spring提供了一系列的start pom来简化Maven的依赖加载,例如,当你使用了spring-boot-starter-web,会自动加入如图5-1所示的依赖包。
4、自动装配Spring
    Spring Boot会根据在类路径中的jar包,类、为jar包里面的类自动配置Bean,这样会极大地减少我们要使用的配置。当然,Spring Boot只考虑大多数的开发场景,并不是所有的场景,若在实际开发中我们需要配置Bean,而Spring Boot没有提供支持,则可以自定义自动配置。
5、准生产的应用监控
    Spring Boot提供基于http ssh telnet对运行时的项目进行监控。
6、无代码生产和xml配置
    Spring Boot不是借助与代码生成来实现的,而是通过条件注解来实现的,这是Spring4.x提供的新特性。
二、Spring Boot入门程序
- 新建一个maven工程

(一)创建maven工程导入springboot依赖 ( 继承父工程并加入web依赖)
  <!--继承指定的父模块pom.xml文件:对项目进行整体的管理维护,如统一版本管理-->
    <parent>
        <groupId>org.springframework.boot</groupId>
        <artifactId>spring-boot-starter-parent</artifactId>
        <version>2.4.3</version>
    </parent>
    <!--spring提供的web项目启动器模块-->
    <dependencies>
        <dependency>
            <groupId>org.springframework.boot</groupId>
            <artifactId>spring-boot-starter-web</artifactId>
        </dependency>
    </dependencies>
Spring Boot将所有的功能场景都抽取出来,做成一个个的starters(启动器),只需要在项目里面引入这些starter 相关场景的所有依赖都会导入进来。要用什么功能就导入什么场景的启动器 。
(二)编写spring Boot的主程序
1、项目结构
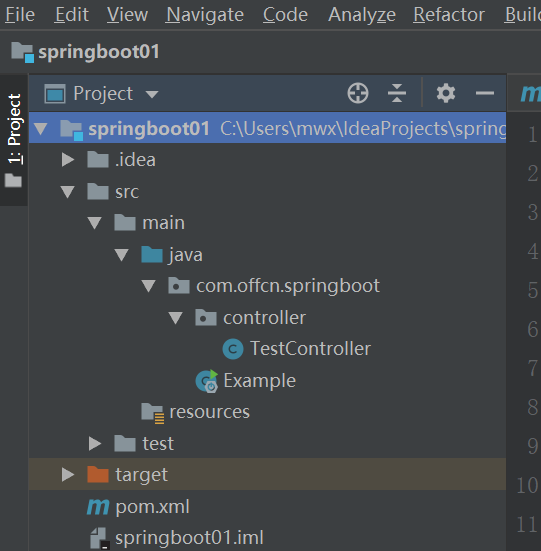
2、主程序代码
@SpringBootApplication
public class Example {
    public static void main(String[] args) {
        /**
         * 启动springboot
         */
        SpringApplication.run(Example.class,args);
    }
}
@SpringBootApplication: 注解说明这个类是SpringBoot的主配置类,SpringBoot 就应该运行这个类的main方法来启动SpringBoot应用;并将主配置类(@SpringBootApplication标注的类)的所在包及下面所有子包里面的所有组件扫描到Spring容器;
(三)编写Controller代码
@Controller
public class TestController {

    @RequestMapping("/hello")
    @ResponseBody
    public String helloWorld(){
        return "Hello world!";
    }
}
(四)运行主程序进行测试

(五)学员编写第一个springboot程序
练习CRUD
Spring Boot第二节
一、Spring Boot的简化部署
(一)添加maven插件
   <!--执行maven命令插件-->
    <build>
        <plugins>
            <plugin>
                <groupId>org.springframework.boot</groupId>
                <artifactId>spring-boot-maven-plugin</artifactId>
            </plugin>
        </plugins>
    </build>
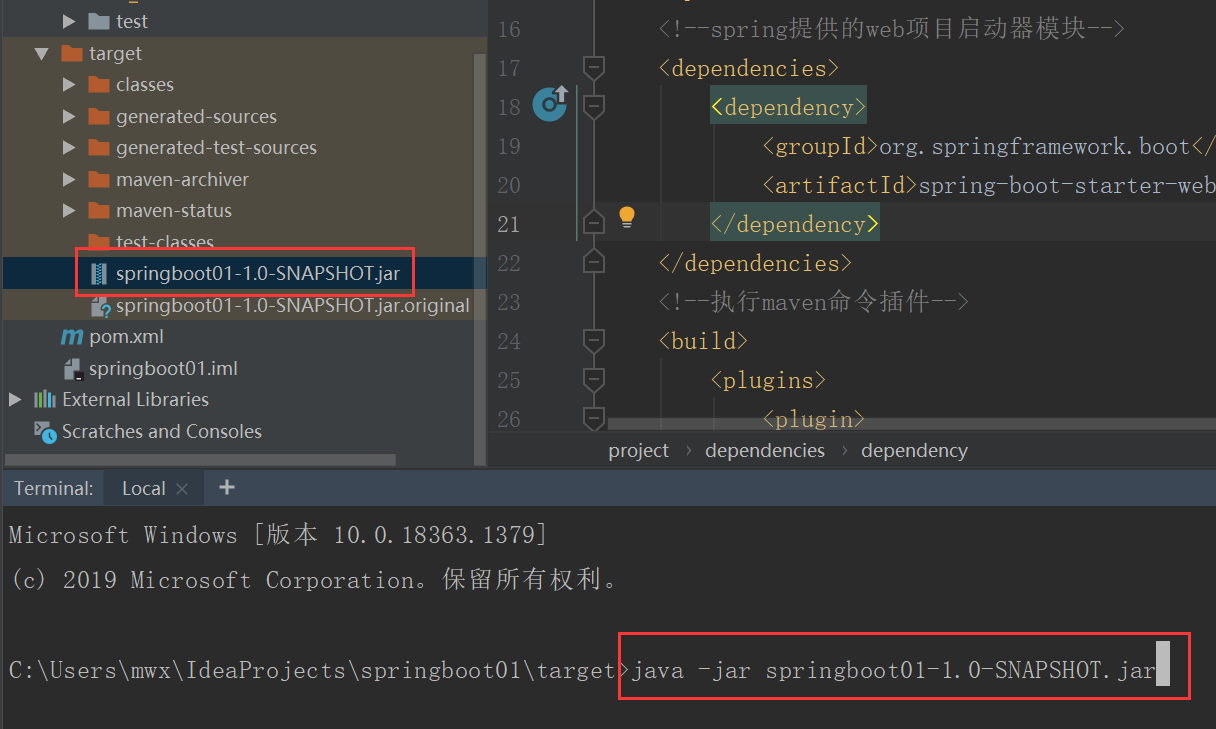
(二)执行package命令给项目打包
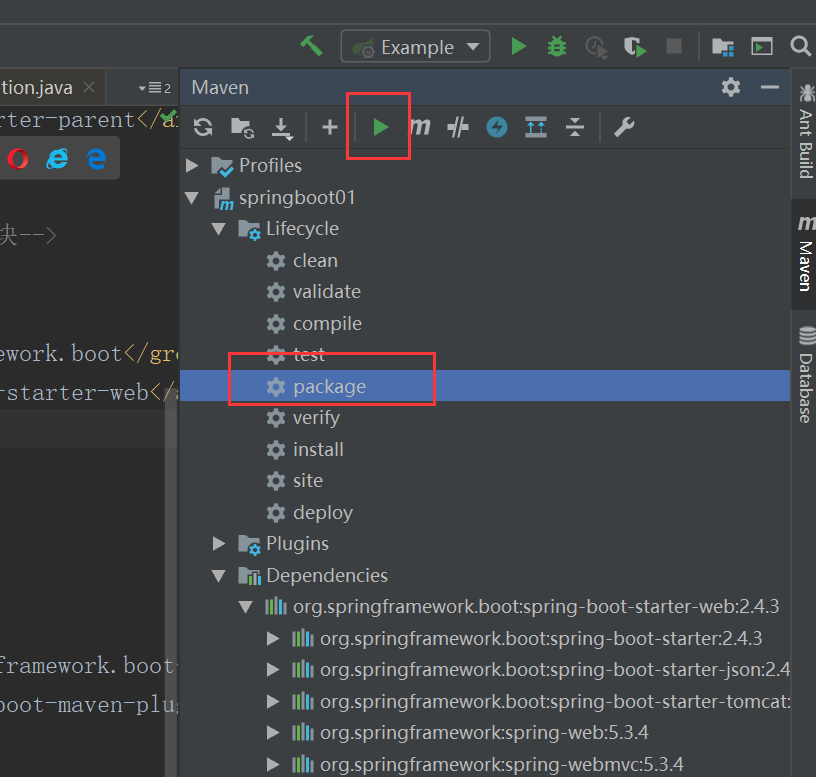
执行打包命令后,会在target目录下生成项目对应的jar包。
(三)执行java -jar命令运行程序
(四)学员进行简化部署练习
二、Spring Initializer快速创建Spring Boot项目
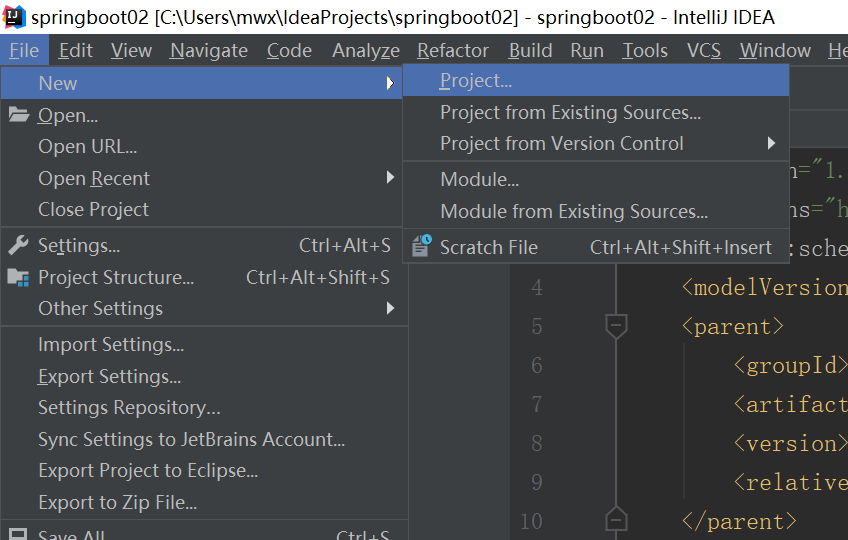
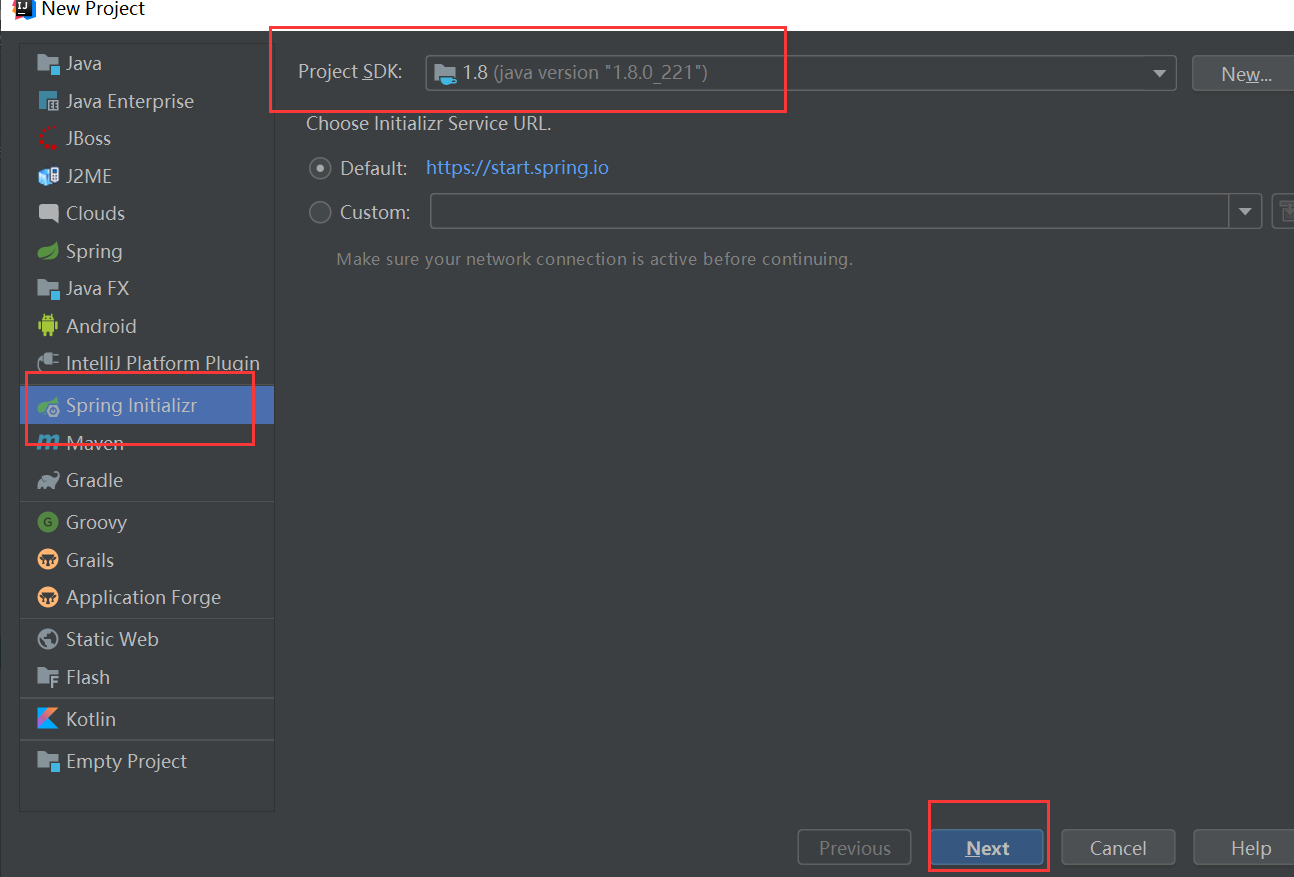
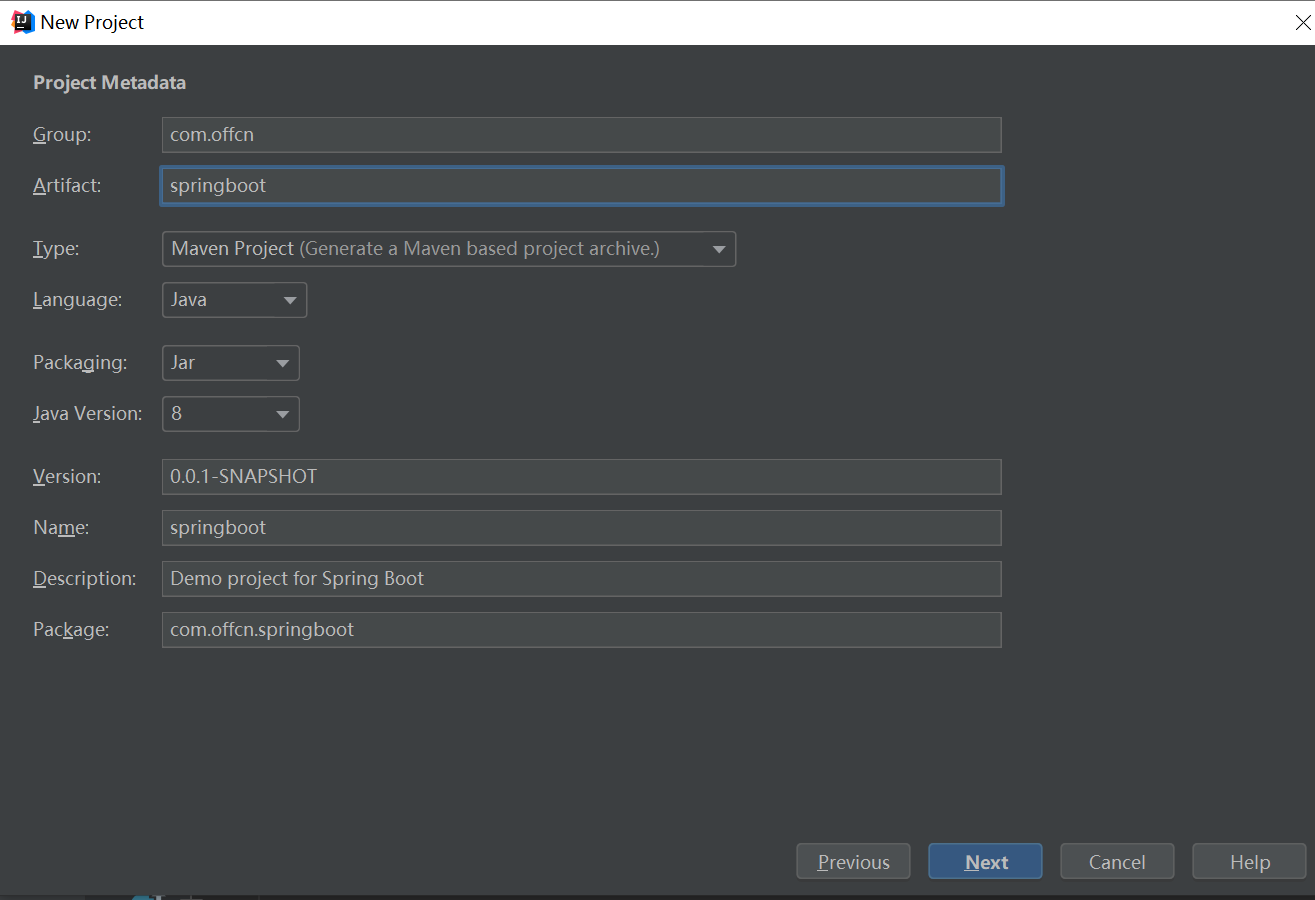
(一)创建Spring Boot项目

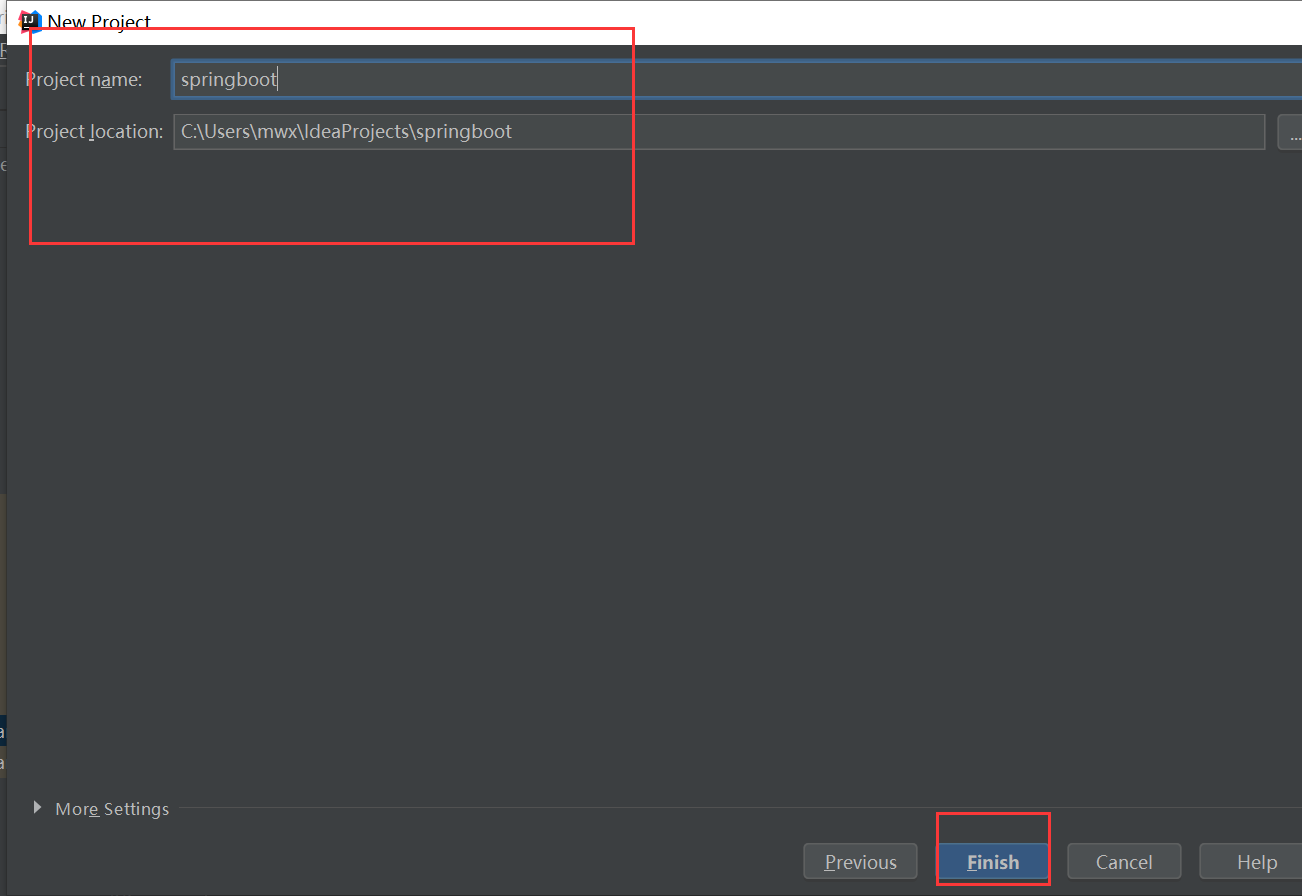
(二)项目结构解析
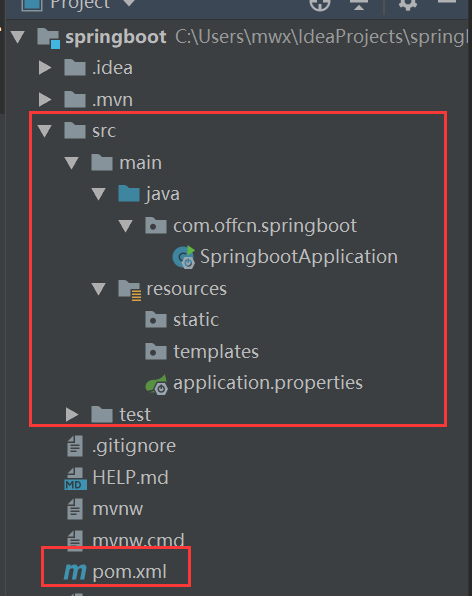
1、java文件夹目录结构中自动创建好指定包和Spring Boot启动主程序SpringbootApplication.class;
2、resources文件夹中目录结构
static:保存所有的静态资源; js css images;
templates:保存所有的模板页面,(Spring Boot默认jar包使用嵌入式的Tomcat,默认不支持JSP页面),可以使用模板引擎(freemarker、thymeleaf);
application.properties:Spring Boot应用的配置文件;可以修改一些默认设置;
Spring Boot第三节
一、Spring Boot配置文件
(一)配置文件的作用及规范
Spring Boot使用一个全局的配置文件,配置文件名是固定的;默认使用以下两种格式:
•application.properties
•application.yml
配置文件的作用:修改SpringBoot自动配置的默认值;Spring Boot启动时会根据配置文件自动注册相关的应用组件;
(二)yaml配置文件
1、yaml的语法
YAML:以数据为中心,比json、xml等更适合做配置文件;
(1)基本语法
– 使用缩进表示层级关系
– 缩进时不允许使用Tab键,只允许使用空格。
– 缩进的空格数目不重要,只要相同层级的元素左侧对齐即可 – 大小写敏感
- 键值对中间必须要有空格k:(空格)v
(2)值的写法
YAML 支持的三种数据结构:
a、字面量:普通的值(数字,字符串,布尔)
server:
  port: 8081
注意:字符串默认不用加上单引号或者双引号;
双引号:特殊符号表示转义符本身;
name: "zhangsan \n lisi":输出;zhangsan 换行 lisi
单引号;特殊字符就表示字符本身;
name: ‘zhangsan \n lisi’:输出;zhangsan \n lisi
b、对象、Map(属性和值)(键值对)
person:
  name: zhangsan
  age: 12
另一种行内写法:
person: {name: zhangsan,age: 12}
c、数组(List,Set)
hobbies:
 - singing
 - dancing
 - running
用-(空格)值表示数组中的一个元素
另一种行内写法:
hobbies: [singing,dancing,running]
2、配置文件值的注入
(1)构建bean对象
//只有spring容器中的对象才能自动进行数据绑定
@Component
//将本类中的所有属性和配置文件中相关的配置进行绑定;
// prefix指定要绑定的配置文件中的属性前缀;
@ConfigurationProperties(prefix = "person")
public class Person {
    private String pname;
    private int age;
    private boolean success;
    private Date birth;

    private Car car;
    private Map<String,Object> maps;
    private List<Object> lists;
    }
(2)构建配置文件
person:
  pname: zhangsan
  age: 12
  birth: 2020/12/12
  success: true
  car:
    cname: 奔驰
    cprice: 200.0
  lists: [唱歌,跳舞]
  maps: {key1: v1,key2: v2}
(3)执行单元测试查看person对象的值
@SpringBootTest
class SpringbootApplicationTests {
    @Autowired
    private Person person;
    @Test
    void contextLoads() {
        System.out.println(person);
    }

}
(4)引入配置文件处理器插件
   <!--作用:编辑配置文件时会有相关提示信息-->
<dependency>
            <groupId> org.springframework.boot </groupId>
            <artifactId> spring-boot-configuration-processor </artifactId>
            <optional> true </optional>
 </dependency>
3、学员练习yuml的值的注入方式
Spring Boot第四节
一、Spring Boot配置文件
(一)properties配置文件
1、properties语法
以KEY=VALue键值对的方式设置值
(1)字面量:普通的值(数字,字符串,布尔)
name=张三
(2)对象、Map(属性和值)(键值对)
person.name=张三
person.age=12
maps.key1=value1
maps.key2=value2
(3)数组(List,Set)
hobbies=singing,dancing,running
2、配置文件值的注入
(1)构建bean对象
//只有spring容器中的对象才能自动进行数据绑定
@Component
//将本类中的所有属性和配置文件中相关的配置进行绑定;
// prefix指定要绑定的配置文件中的属性前缀;
@ConfigurationProperties(prefix = "person")
public class Person {
    private String pname;
    private int age;
    private boolean success;
    private Date birth;

    private Car car;
    private Map<String,Object> maps;
    private List<Object> lists;
    }
(2)构建配置文件
person.pname=张三
person.age=12
person.birth=2019/12/12
person.success=true
person.car.cname=宝马
person.car.cprice=100.0
person.lists=唱歌,跳舞,跑步
person.maps.k1=value1
person.maps.k2=value2
(3)执行单元测试查看person对象的值
@SpringBootTest
class SpringbootApplicationTests {
    @Autowired
    private Person person;
    @Test
    void contextLoads() {
        System.out.println(person);
    }

}
3、学员练习properties的值的注入方式
(二)@ConfigurationProperties注解和@Value注解的区别
1、@ConfigurationProperties注解用于根据配置文件批量注入值,springboot默认配置文件application.yml/application.properties;
2、@Value注解用于根据配置文件单个注入值;
| 区别 | @ConfigurationProperties | @Value |
|---|---|---|
| SpEL | 不支持 | 支持 |
| 复杂类型封装 | 支持 | 不支持 |
案例:
@Component
//@ConfigurationProperties(prefix = "person")
public class Person {
    @Value("${person.pname}")
    private String pname;
    @Value("#{12*2}")
    private int age;
    private boolean success;
    private Date birth;
    private Car car;
    private Map<String,Object> map;
    private List<Object> hobbies;
    }
(三)配置文件中的占位符
1、springboot全局配置文件中可以使用随机数
${random.value}、${random.int}、${random.long}
${random.int(10)}、${random.int[1024,65536]}
2、springboot全局配置文件中可以使用占位符
通过${属性名}获取已经在配置文件中加载过的属性值;
通过${属性名:默认值}来指定找不到属性时的默认值;
案例:
person.pname=张三
person.age=${random.int}
person.success=true
person.birth=2012/12/12
person.car.cname=${car.cname:奔驰}
person.car.cprice=200.0
person.map.key1=value1
person.map.key2=value2
person.hobbies=唱歌,跳舞,跑步
(四)多环境支持
Profile是Spring对不同环境提供不同配置功能的支持,可以通过激活、指定参数等方式快速切换环境;
1、多文件多环境形式:
格式:application-{profile}.properties/yml
例如:可以在项目中创建如下主配置文件:application-dev.properties、application-test.properties、application-prod.properties、application.properties,默认使用application.properties,可以通过配置spring.profiles.active=profile指定使用某个环境的配置文件。
2、yaml支持单文件多环境形式:
spring:
  profiles:
    active: test
---
spring:
  profiles: dev
server:
  port: 8081
---
spring:
  profiles: test
server:
  port: 8082
通过---来区分不同的profile环境。
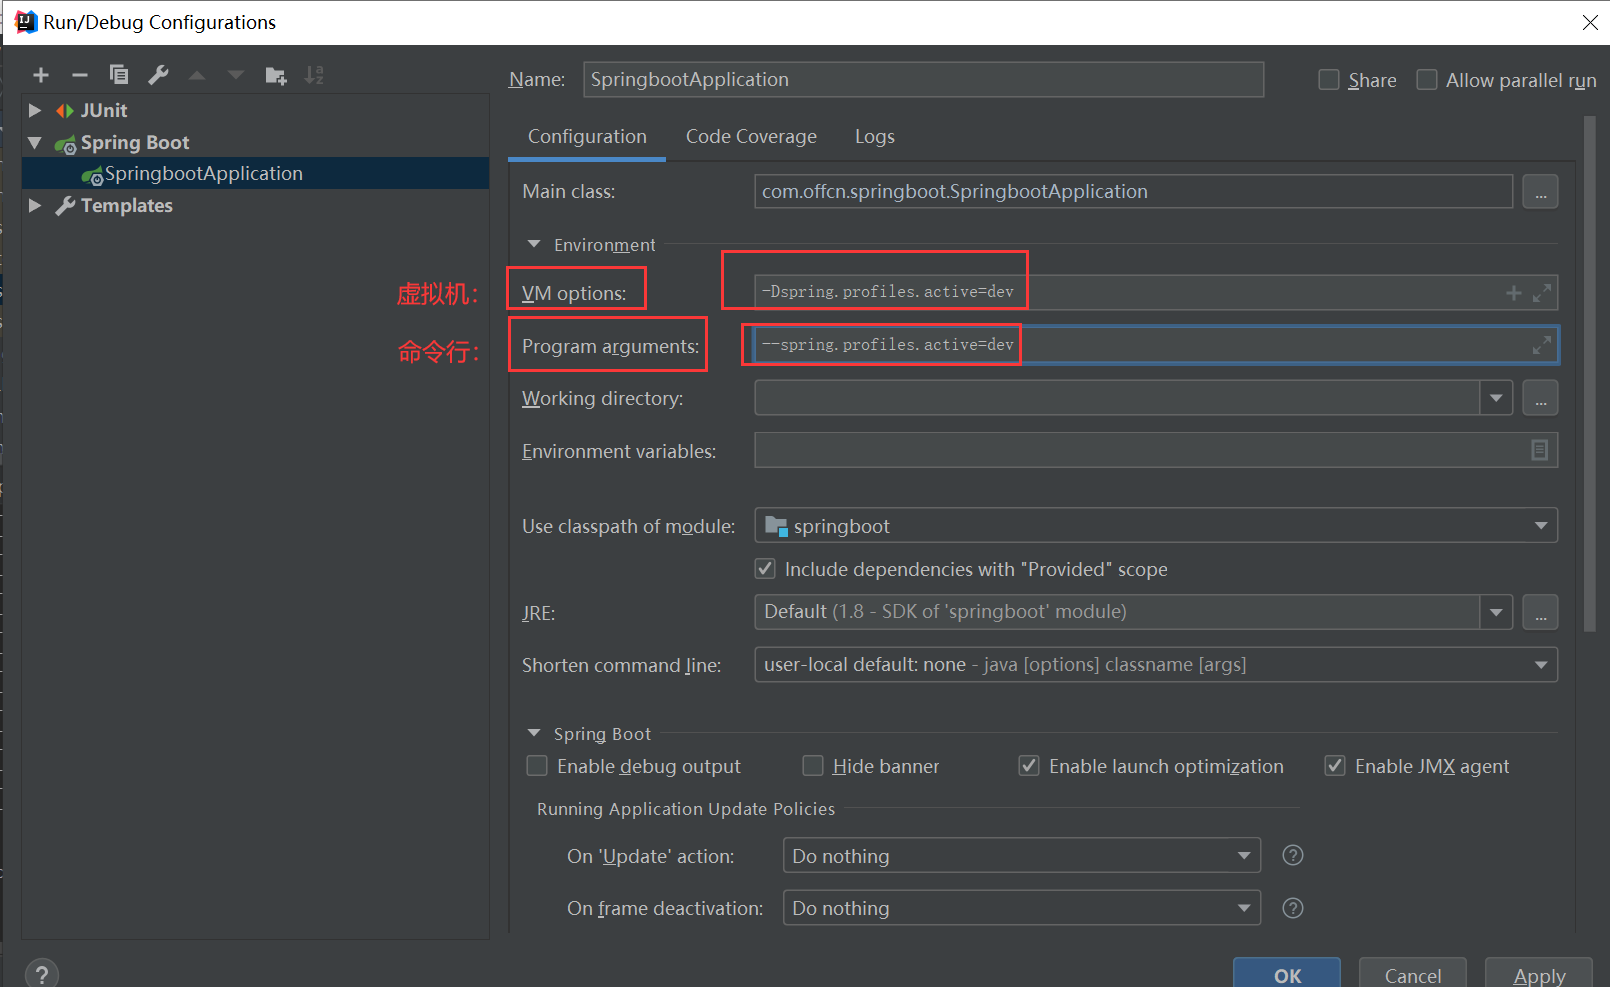
3、激活方式:
  在配置文件中指定 spring.profiles.active=dev
  命令行  java -jar springboot-0.0.1-SNAPSHOT.jar --spring.profiles.active=dev
  jvm参数 -Dspring.profiles.active=dev
(五)配置文件加载位置
springboot默认会从以下位置加载配置文件:application.properties/application.yml
项目所在磁盘路径file:./config/
项目所在磁盘路径file:./
项目类路径classpath:/config/
项目类路径classpath:/
优先级由高到底,高优先级的配置会覆盖低优先级的配置;SpringBoot会从这四个位置全部加载主配置文件,互补配置;
如果要加载其他位置的配置文件,可以通过--spring.config.location(只能加到命令行)来指定要加载的配置文件的位置。
Spring Boot第五节
一、Spring Boot的web开发
讲解思路:
 本章节主要掌握springboot当中静态资源的处理,springboot当中提供的静态资源存放的位置。 在实际当中开发,我们应该满足springboot的约定和规范。如果提供的静态资源目录不能满足实际的需求,还可以自定义静态资源的位置
(一)springboot关于静态资源的处理
springboot启动时会根据配置文件自动配置相应场景的组件xxxAutoConfiguration,web项目启动时会初始化WebMvcAutoConfiguration组件处理请求相关的操作,其中有默认处理静态资源的方法:
@Override
		protected void addResourceHandlers(ResourceHandlerRegistry registry) {
			super.addResourceHandlers(registry);
			if (!this.resourceProperties.isAddMappings()) {
				logger.debug("Default resource handling disabled");
				return;
			}
			ServletContext servletContext = getServletContext();
			addResourceHandler(registry, "/webjars/**", "classpath:/META-INF/resources/webjars/");
			addResourceHandler(registry, this.mvcProperties.getStaticPathPattern(), (registration) -> {
				registration.addResourceLocations(this.resourceProperties.getStaticLocations());
				if (servletContext != null) {
					registration.addResourceLocations(new ServletContextResource(servletContext, SERVLET_LOCATION));
				}
			});
		}
从该方法中可以发现:
1、默认情况下:
(1)匹配/webjars/** 的请求,都去 classpath:/META-INF/resources/webjars/ 找资源;
(2)匹配 "/**" 的请求,都去(静态资源的文件夹)找映射,静态资源文件夹路径如下:
"classpath:/META‐INF/resources/"
"classpath:/resources/"
"classpath:/static/"
"classpath:/public/"
"/":当前项目的根路径
2、自定义配置静态资源路径:
spring.web.resources.static-locations=自定义路径
1、webjars的使用
我们可以通过webjars以jar包的方式引入静态资源。
(1)引入依赖
 <!--jquery的jar包引入-->
        <dependency>
            <groupId>org.webjars</groupId>
            <artifactId>jquery</artifactId>
            <version>3.6.0</version>
        </dependency>
(2)启动服务访问资源
浏览器访问路径:http://localhost:8080/webjars/jquery/3.6.0/jquery.min.js获取相应的静态资源。
(3)学员练习webjars的使用
2、静态资源的存放位置
(1)默认存放位置查看
默认静态资源路径:
"classpath:/META‐INF/resources/"
"classpath:/resources/"
"classpath:/static/"
"classpath:/public/"
"/":当前项目的根路径
案例:在上述任意路径下创建静态资源hello.html,浏览器访问路径:http://localhost:8080/hello.html获取相应的静态资源。
(2)自定义位置存放
在配置文件中通过属性spring.web.resources.static-locations=自定义路径,设置自定义静态资源存放路径;
案例:
a、配置文件中设置:spring.web.resources.static-locations=classpath:/hello/
b、在自定义路径下添加静态资源hello.html,浏览器访问路径:http://localhost:8080/hello.html获取相应的静态资源。
注意:自定义静态资源路径后,默认静态资源路径失效!
(3)学员练习自定义静态资源访问
Spring Boot第六节
一、Spring Boot的web开发
讲解思路:
  本章节有两大重点:
  1、掌握springboot web模块的自动配置原理,从该模块引申,整个springboot当中大量的应用了自动配置,实现的具体思路相同。
  2、自定义拦截器,注册拦截器,演示拦截器是否生效,拦截器在实际当中有大量的应用,务必掌握
(一)springboot的自动配置
1、自动配置原理
(1)springboot启动时加载主配值类,解析注解@SpringBootApplication
@SpringBootApplication
public class SpringbootApplication {

    public static void main(String[] args) {
        SpringApplication.run(SpringbootApplication.class, args);
    }
}
(2)在@SpringBootApplication组合注解中解析@EnableAutoConfiguration获取自动配置信息
//在@EnableAutoConfiguration注解中,为容器导入自动配置的组件:
@Target(ElementType.TYPE)
@Retention(RetentionPolicy.RUNTIME)
@Documented
@Inherited
@AutoConfigurationPackage
@Import(AutoConfigurationImportSelector.class)
public @interface EnableAutoConfiguration{
    ...
}
//1、第一步:通过AutoConfigurationImportSelector类的selectImports方法获取要导入的自动配置组件
	@Override
	public String[] selectImports(AnnotationMetadata annotationMetadata) {
		if (!isEnabled(annotationMetadata)) {
			return NO_IMPORTS;
		}
        //获取自动配置的内容
		AutoConfigurationEntry autoConfigurationEntry = getAutoConfigurationEntry(annotationMetadata);
		return StringUtils.toStringArray(autoConfigurationEntry.getConfigurations());
	}
//2、第二步:
	protected AutoConfigurationEntry getAutoConfigurationEntry(AnnotationMetadata annotationMetadata) {
		if (!isEnabled(annotationMetadata)) {
			return EMPTY_ENTRY;
		}
		AnnotationAttributes attributes = getAttributes(annotationMetadata);
        //获取配置信息
		List<String> configurations = getCandidateConfigurations(annotationMetadata, attributes);
		configurations = removeDuplicates(configurations);
		Set<String> exclusions = getExclusions(annotationMetadata, attributes);
		checkExcludedClasses(configurations, exclusions);
		configurations.removeAll(exclusions);
		configurations = getConfigurationClassFilter().filter(configurations);
		fireAutoConfigurationImportEvents(configurations, exclusions);
		return new AutoConfigurationEntry(configurations, exclusions);
	}
//3、第三步:
protected List<String> getCandidateConfigurations(AnnotationMetadata metadata, AnnotationAttributes attributes) {
    	//获取配置信息
		List<String> configurations = SpringFactoriesLoader.loadFactoryNames(getSpringFactoriesLoaderFactoryClass(),
				getBeanClassLoader());
		Assert.notEmpty(configurations, "No auto configuration classes found in META-INF/spring.factories. If you "
				+ "are using a custom packaging, make sure that file is correct.");
		return configurations;
	}
//4、第四步:
	public static List<String> loadFactoryNames(Class<?> factoryType, @Nullable ClassLoader classLoader) {
		ClassLoader classLoaderToUse = classLoader;
		if (classLoaderToUse == null) {
			classLoaderToUse = SpringFactoriesLoader.class.getClassLoader();
		}
		String factoryTypeName = factoryType.getName();
        //获取要自动注入的组件信息
		return loadSpringFactories(classLoaderToUse).getOrDefault(factoryTypeName, Collections.emptyList());
	}
//5、第五步:
private static Map<String, List<String>> loadSpringFactories(ClassLoader classLoader) {
		Map<String, List<String>> result = cache.get(classLoader);
		if (result != null) {
			return result;
		}

		result = new HashMap<>();
		try {
            //获取要自动注入的组件信息
			Enumeration<URL> urls = classLoader.getResources(FACTORIES_RESOURCE_LOCATION);
			while (urls.hasMoreElements()) {
				URL url = urls.nextElement();
				UrlResource resource = new UrlResource(url);
				Properties properties = PropertiesLoaderUtils.loadProperties(resource);
				for (Map.Entry<?, ?> entry : properties.entrySet()) {
					String factoryTypeName = ((String) entry.getKey()).trim();
					String[] factoryImplementationNames =
							StringUtils.commaDelimitedListToStringArray((String) entry.getValue());
					for (String factoryImplementationName : factoryImplementationNames) {
						result.computeIfAbsent(factoryTypeName, key -> new ArrayList<>())
								.add(factoryImplementationName.trim());
					}
				}
			}

			// Replace all lists with unmodifiable lists containing unique elements
			result.replaceAll((factoryType, implementations) -> implementations.stream().distinct()
					.collect(Collectors.collectingAndThen(Collectors.toList(), Collections::unmodifiableList)));
			cache.put(classLoader, result);
		}
		catch (IOException ex) {
			throw new IllegalArgumentException("Unable to load factories from location [" +
					FACTORIES_RESOURCE_LOCATION + "]", ex);
		}
		return result;
	}
//第六步:获取自动配置信息spring.factories
public static final String FACTORIES_RESOURCE_LOCATION = "META-INF/spring.factories";
获取到配置文件中的自动配置类xxxAutoConfiguration的信息,并将自动配置类中的组件初始化到容器中。
初始化的过程中会加载xxxProperties对象,根据xxxProperties对象中的属性值初始化组件,xxxProperties对象的值可以通过全局配置文件指定。
(3)初始化自动配置组件
以Spring Boot 自动配置SpringMVC为例,Spring Boot启动时会做以下操作:
//根据以上步骤找到自动配置类WebMvcAutoConfiguration,并根据自动配置类进行以下初始化操作:
@Configuration(proxyBeanMethods = false)//表示这是一个配置类,和以前编写的配置文件一样
@ConditionalOnWebApplication(type = Type.SERVLET)//@Conditional判断满足指定的条件,整个配置类里面的配置就会生效,否则不生效; 这里是判断当前应用是否是web应用,如果是当前配置类生效
@ConditionalOnClass({ Servlet.class, DispatcherServlet.class, WebMvcConfigurer.class })//判断当前项目有没有以上指定类
@ConditionalOnMissingBean(WebMvcConfigurationSupport.class)//判断容器中是否没有指定组件
@AutoConfigureOrder(Ordered.HIGHEST_PRECEDENCE + 10)//自动配置顺序
@AutoConfigureAfter({ DispatcherServletAutoConfiguration.class, TaskExecutionAutoConfiguration.class,
		ValidationAutoConfiguration.class })//在指定自动配置之后配置
public class WebMvcAutoConfiguration {
    	/**
         * a、自动配置视图解析器
         */
    	@Bean//给容器中添加组件
		@ConditionalOnBean(ViewResolver.class)
		@ConditionalOnMissingBean(name = "viewResolver", value = ContentNegotiatingViewResolver.class)
		public ContentNegotiatingViewResolver viewResolver(BeanFactory beanFactory) {
			ContentNegotiatingViewResolver resolver = new ContentNegotiatingViewResolver();
			resolver.setContentNegotiationManager(beanFactory.getBean(ContentNegotiationManager.class));
			// ContentNegotiatingViewResolver uses all the other view resolvers to locate
			// a view so it should have a high precedence
			resolver.setOrder(Ordered.HIGHEST_PRECEDENCE);
			return resolver;
		}
    	/**
         * 自动配置视图解析器
         */
        @Bean
		@ConditionalOnBean(View.class)
		@ConditionalOnMissingBean
		public BeanNameViewResolver beanNameViewResolver() {
			BeanNameViewResolver resolver = new BeanNameViewResolver();
			resolver.setOrder(Ordered.LOWEST_PRECEDENCE - 10);
			return resolver;
		}

    	/**
         * b、提供静态资源访问路径和webjars访问路径
         */
    	@Override
		protected void addResourceHandlers(ResourceHandlerRegistry registry) {
			super.addResourceHandlers(registry);
			if (!this.resourceProperties.isAddMappings()) {
				logger.debug("Default resource handling disabled");
				return;
			}
			ServletContext servletContext = getServletContext();
			addResourceHandler(registry, "/webjars/**", "classpath:/META-INF/resources/webjars/");
			addResourceHandler(registry, this.mvcProperties.getStaticPathPattern(), (registration) -> {
				registration.addResourceLocations(this.resourceProperties.getStaticLocations());
				if (servletContext != null) {
					registration.addResourceLocations(new ServletContextResource(servletContext, SERVLET_LOCATION));
				}
			});
		}


    -----------------内部类--------------------
    @Configuration(proxyBeanMethods = false)
	@Import(EnableWebMvcConfiguration.class)
	@EnableConfigurationProperties({ WebMvcProperties.class,
			org.springframework.boot.autoconfigure.web.ResourceProperties.class, WebProperties.class })
	@Order(0)
	public static class WebMvcAutoConfigurationAdapter implements WebMvcConfigurer {

		private final WebMvcProperties mvcProperties;

		private final ListableBeanFactory beanFactory;

		private final ObjectProvider<HttpMessageConverters> messageConvertersProvider;

		private final ObjectProvider<DispatcherServletPath> dispatcherServletPath;

		private final ObjectProvider<ServletRegistrationBean<?>> servletRegistrations;

		final ResourceHandlerRegistrationCustomizer resourceHandlerRegistrationCustomizer;
		//该内部类只有一个带参构造方法,那么spring在创建该类实例时,只能从容器中获取参数;
		public WebMvcAutoConfigurationAdapter(WebProperties webProperties, WebMvcProperties mvcProperties,
				ListableBeanFactory beanFactory, ObjectProvider<HttpMessageConverters> messageConvertersProvider,
				ObjectProvider<ResourceHandlerRegistrationCustomizer> resourceHandlerRegistrationCustomizerProvider,
				ObjectProvider<DispatcherServletPath> dispatcherServletPath,
				ObjectProvider<ServletRegistrationBean<?>> servletRegistrations) {
			this.mvcProperties = mvcProperties;
			this.beanFactory = beanFactory;
			this.messageConvertersProvider = messageConvertersProvider;
			this.resourceHandlerRegistrationCustomizer = resourceHandlerRegistrationCustomizerProvider.getIfAvailable();
			this.dispatcherServletPath = dispatcherServletPath;
			this.servletRegistrations = servletRegistrations;
			this.mvcProperties.checkConfiguration();
		}
		/**
         * c、自动注册Converter类型转换器
         */
		@Override
		public void configureMessageConverters(List<HttpMessageConverter<?>> converters) {
			this.messageConvertersProvider
					.ifAvailable((customConverters) -> converters.addAll(customConverters.getConverters()));
		}

		@Override
		public void configureAsyncSupport(AsyncSupportConfigurer configurer) {
			if (this.beanFactory.containsBean(TaskExecutionAutoConfiguration.APPLICATION_TASK_EXECUTOR_BEAN_NAME)) {
				Object taskExecutor = this.beanFactory
						.getBean(TaskExecutionAutoConfiguration.APPLICATION_TASK_EXECUTOR_BEAN_NAME);
				if (taskExecutor instanceof AsyncTaskExecutor) {
					configurer.setTaskExecutor(((AsyncTaskExecutor) taskExecutor));
				}
			}
			Duration timeout = this.mvcProperties.getAsync().getRequestTimeout();
			if (timeout != null) {
				configurer.setDefaultTimeout(timeout.toMillis());
			}
		}

		@Override
		public void configurePathMatch(PathMatchConfigurer configurer) {
			if (this.mvcProperties.getPathmatch()
					.getMatchingStrategy() == WebMvcProperties.MatchingStrategy.PATH_PATTERN_PARSER) {
				configurer.setPatternParser(new PathPatternParser());
			}
			configurer.setUseSuffixPatternMatch(this.mvcProperties.getPathmatch().isUseSuffixPattern());
			configurer.setUseRegisteredSuffixPatternMatch(
					this.mvcProperties.getPathmatch().isUseRegisteredSuffixPattern());
			this.dispatcherServletPath.ifAvailable((dispatcherPath) -> {
				String servletUrlMapping = dispatcherPath.getServletUrlMapping();
				if (servletUrlMapping.equals("/") && singleDispatcherServlet()) {
					UrlPathHelper urlPathHelper = new UrlPathHelper();
					urlPathHelper.setAlwaysUseFullPath(true);
					configurer.setUrlPathHelper(urlPathHelper);
				}
			});
		}

		private boolean singleDispatcherServlet() {
			return this.servletRegistrations.stream().map(ServletRegistrationBean::getServlet)
					.filter(DispatcherServlet.class::isInstance).count() == 1;
		}

		@Override
		public void configureContentNegotiation(ContentNegotiationConfigurer configurer) {
			WebMvcProperties.Contentnegotiation contentnegotiation = this.mvcProperties.getContentnegotiation();
			configurer.favorPathExtension(contentnegotiation.isFavorPathExtension());
			configurer.favorParameter(contentnegotiation.isFavorParameter());
			if (contentnegotiation.getParameterName() != null) {
				configurer.parameterName(contentnegotiation.getParameterName());
			}
			Map<String, MediaType> mediaTypes = this.mvcProperties.getContentnegotiation().getMediaTypes();
			mediaTypes.forEach(configurer::mediaType);
		}

		@Bean
		@ConditionalOnMissingBean
		public InternalResourceViewResolver defaultViewResolver() {
			InternalResourceViewResolver resolver = new InternalResourceViewResolver();
			resolver.setPrefix(this.mvcProperties.getView().getPrefix());
			resolver.setSuffix(this.mvcProperties.getView().getSuffix());
			return resolver;
		}

		@Bean
		@ConditionalOnBean(View.class)
		@ConditionalOnMissingBean
		public BeanNameViewResolver beanNameViewResolver() {
			BeanNameViewResolver resolver = new BeanNameViewResolver();
			resolver.setOrder(Ordered.LOWEST_PRECEDENCE - 10);
			return resolver;
		}

		@Bean
		@ConditionalOnBean(ViewResolver.class)
		@ConditionalOnMissingBean(name = "viewResolver", value = ContentNegotiatingViewResolver.class)
		public ContentNegotiatingViewResolver viewResolver(BeanFactory beanFactory) {
			ContentNegotiatingViewResolver resolver = new ContentNegotiatingViewResolver();
			resolver.setContentNegotiationManager(beanFactory.getBean(ContentNegotiationManager.class));
			// ContentNegotiatingViewResolver uses all the other view resolvers to locate
			// a view so it should have a high precedence
			resolver.setOrder(Ordered.HIGHEST_PRECEDENCE);
			return resolver;
		}
		//e、自动注册消息代码提示处理器MessageCodesResolver
		@Override
		public MessageCodesResolver getMessageCodesResolver() {
			if (this.mvcProperties.getMessageCodesResolverFormat() != null) {
				DefaultMessageCodesResolver resolver = new DefaultMessageCodesResolver();
				resolver.setMessageCodeFormatter(this.mvcProperties.getMessageCodesResolverFormat());
				return resolver;
			}
			return null;
		}
		//获取所有的格式化器和转换器
		@Override
		public void addFormatters(FormatterRegistry registry) {
			ApplicationConversionService.addBeans(registry, this.beanFactory);
		}

---------------------------------------------------------
//EnableWebMvcConfiguration内部类:
       // c、自动注册Formatter格式化器;
        @Bean
		@Override
		public FormattingConversionService mvcConversionService() {
			Format format = this.mvcProperties.getFormat();
			WebConversionService conversionService = new WebConversionService(new DateTimeFormatters()
					.dateFormat(format.getDate()).timeFormat(format.getTime()).dateTimeFormat(format.getDateTime()));
			addFormatters(conversionService);
			return conversionService;
		}
        //f、支持静态首页index.html访问
        private Resource getWelcomePage() {
			for (String location : this.resourceProperties.getStaticLocations()) {
				Resource indexHtml = getIndexHtml(location);
				if (indexHtml != null) {
					return indexHtml;
				}
			}
			ServletContext servletContext = getServletContext();
			if (servletContext != null) {
				return getIndexHtml(new ServletContextResource(servletContext, SERVLET_LOCATION));
			}
			return null;
		}

-------------------------------------------------------
		@Bean
		@ConditionalOnMissingBean({ RequestContextListener.class, RequestContextFilter.class })
		@ConditionalOnMissingFilterBean(RequestContextFilter.class)
		public static RequestContextFilter requestContextFilter() {
			return new OrderedRequestContextFilter();
		}

	}


}
a、自动配置视图解析器ViewResolver(ContentNegotiatingViewResolver 和 BeanNameViewResolver),作用:根据方法返回值得到视图对象,由视图对象决定请求转发或者重定向到指定视图。(注意:此处会创建获取容器中的所有视图解析器,包括自定义的视图解析器)
b、提供静态资源访问路径和webjars访问路径;
c、自动注册Converter类型转换器,Formatter格式化器;
d、提供HttpMessageConverters,用于Http请求和响应之间的转换,将json或者xml格式字符串和java类型之间做转换;
(注意:如果要自定义类型转换器,也可以通过该接口注册)
@Configuration(proxyBeanMethods = false)
public class MyConfiguration {

    @Bean
    public HttpMessageConverters customConverters() {
        HttpMessageConverter<?> additional = ...
        HttpMessageConverter<?> another = ...
        return new HttpMessageConverters(additional, another);
    }

}
e、自动注册消息代码提示处理器MessageCodesResolver
f、支持静态首页index.html访问
g、自动注册web数据参数绑定对象ConfigurableWebBindingInitializer,如果我们自己注册了该类型对象,那springboot会自动调用我们注册的对象,替换默认对象将请求参数绑定到javabean(了解)。
h、如果要自定义拦截器interceptors,格式化器formatters,视图控制器view controllers等,可以通过创建类型为WebMvcConfigurer的配置类来实现,不要加注解@EnableWebMvc。
i、如果要自定义处理器映射器RequestMappingHandlerMapping, 处理器适配器RequestMappingHandlerAdapter, 或者异常处理器ExceptionHandlerExceptionResolver,可以在容器中创建类型为WebMvcRegistrations的组件对象来实现。
j、如果想要完全使用自定义配置,不使用springboot默认配置,可以在配置类上加注解@EnableWebMvc。(不推荐)

参考官方文档:https://docs.spring.io/spring-boot/docs/2.4.3/reference/html/spring-boot-features.html#boot-features-spring-mvc
(4)小结
a、SpringBoot启动会加载大量的自动配置类
b、根据配置文件和xxxProperties的默认设置初始化自动配置类中的组件
c、可以在自动配置类中查看我们需要的功能是否已经自动配置,如果配置,我们就不用再做配置了;
2、自定义配置实现访问拦截
(1)自定义拦截器
public class MyIntercepter implements HandlerInterceptor {
    @Override
    public boolean preHandle(HttpServletRequest request, HttpServletResponse response, Object handler) throws Exception {
        HttpSession session = request.getSession();
        String username=(String)session.getAttribute("username");
        if(username!=null){
            System.out.println("登录成功不拦截");
            return true;
        }else{
            request.getRequestDispatcher("/index.html").forward(request,response);
            System.out.println("未登录拦截");
            return false;
        }
    }

    @Override
    public void postHandle(HttpServletRequest request, HttpServletResponse response, Object handler, ModelAndView modelAndView) throws Exception {

    }

    @Override
    public void afterCompletion(HttpServletRequest request, HttpServletResponse response, Object handler, Exception ex) throws Exception {

    }
}
(2)注册拦截器
@Configuration
public class MyConfig implements WebMvcConfigurer {

    @Override
    public void addInterceptors(InterceptorRegistry registry) {
        registry.addInterceptor(new MyIntercepter()).addPathPatterns("/**").excludePathPatterns("/","/index.html","/user/login");
    }
}
3、自定义配置视图控制器
//springboot默认不支持jsp,而是使用模板引擎thymeleaf作为视图
//引入thymeleaf
        <dependency>
            <groupId>org.springframework.boot</groupId>
            <artifactId>spring-boot-starter-thymeleaf</artifactId>
        </dependency>
//配置视图控制器
@Configuration
public class MyConfig implements WebMvcConfigurer {
    @Override
    public void addInterceptors(InterceptorRegistry registry) {
        registry.addInterceptor(new MyIntercepter()).addPathPatterns("/**").excludePathPatterns("/","/index.html","/user/login");
    }
	//配置视图控制器
    @Override
    public void addViewControllers(ViewControllerRegistry registry) {
        registry.addViewController("/main").setViewName("main");
    }
}